Data Subject Requests (DSRs) can be created automatically or manually in Kertos. Ideally, you import DSRs automatically using our Zendesk integration or from an E-Mail inbox that Data Subjects use to send DSRs, for example a customer support E-Mail. If that is not possible, you can create DSRs directly in Kertos.
Importing DSRs from Ticketing Tools (Zendesk, HubSpot, Freshdesk, ..)
Creating an API key in Kertos
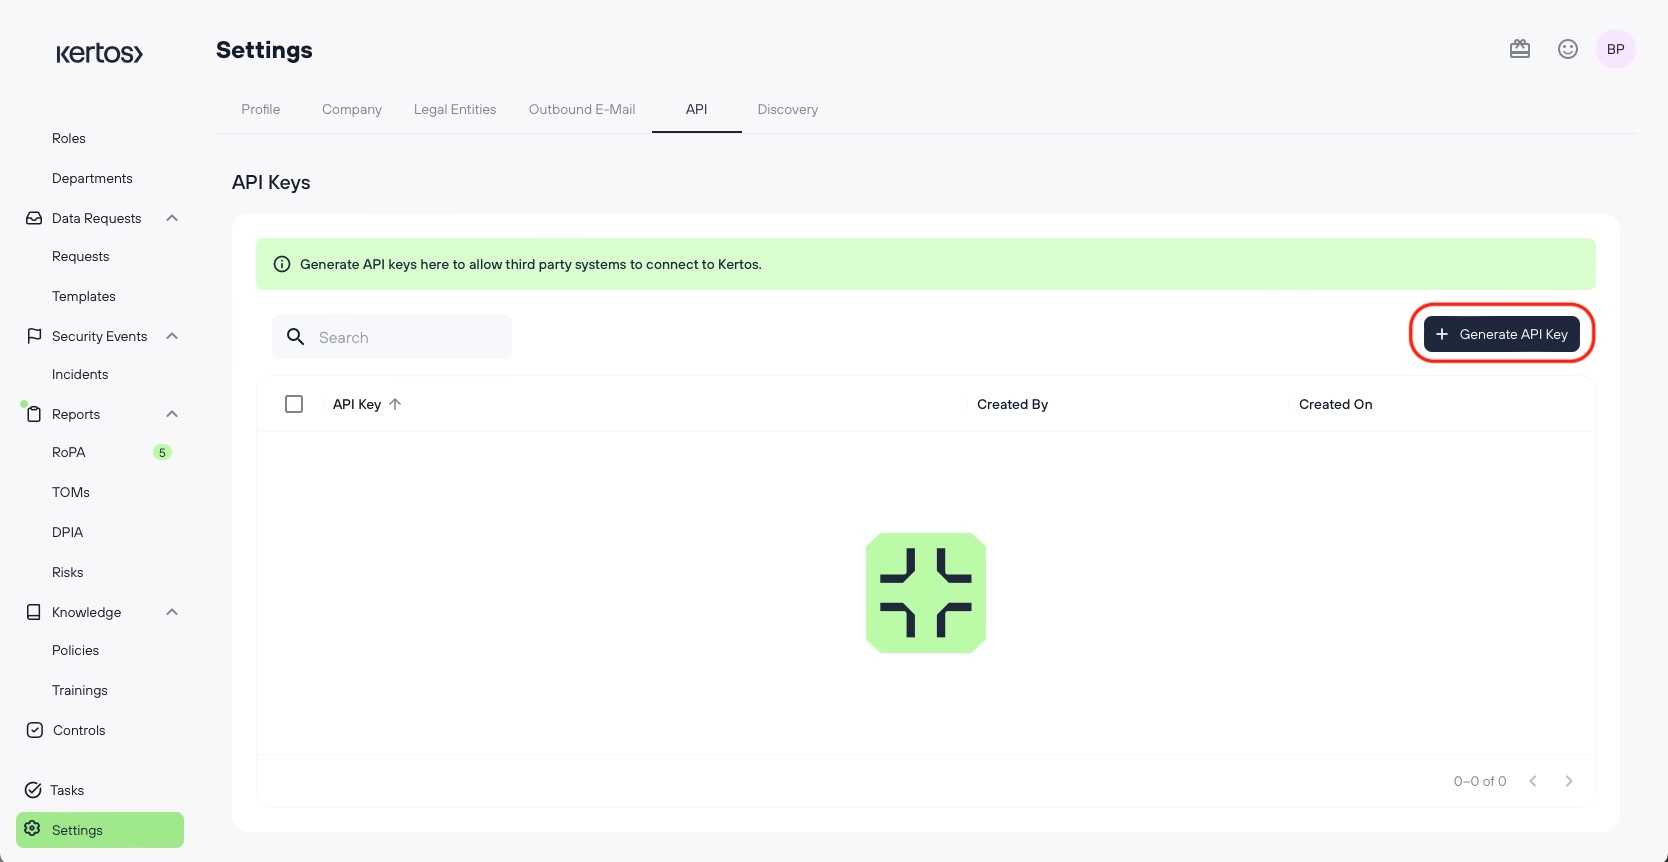
In Kertos, go to “Settings”, and then to the tab “API”.
Click “Generate API Key”.
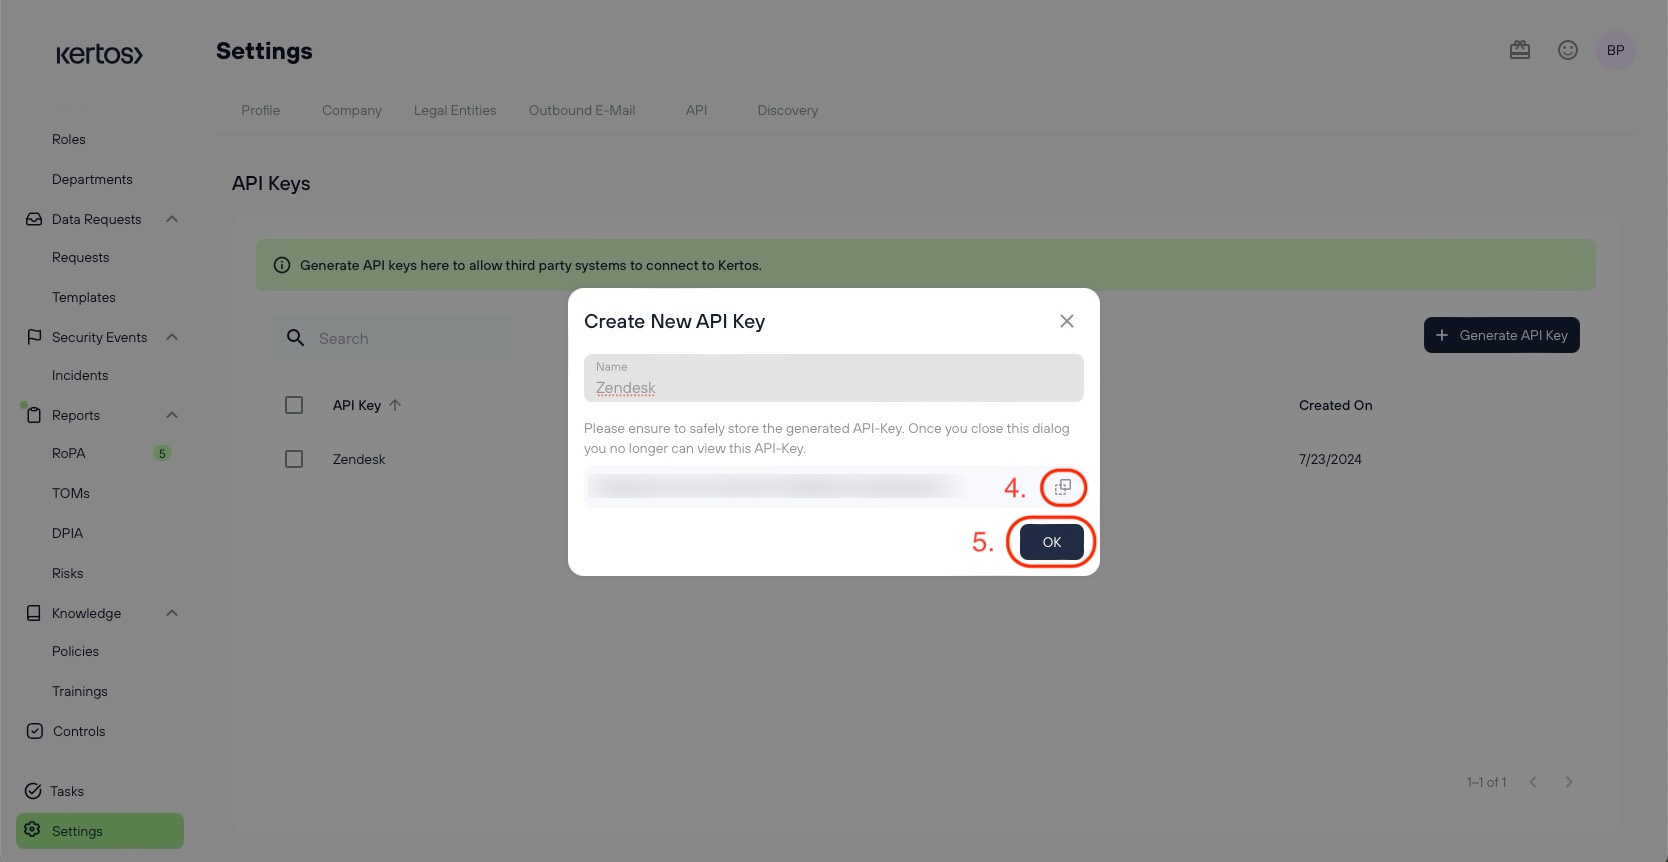
Name the API Key “Zendesk”.
Copy the key to your clipboard.
For security reasons, you will not be able to view your key again after closing this pop-up.
Click “Ok” to close the pop-up.
Creating a new webhook in Zendesk
You will need Zendesk admin permissions to complete this setup. If you do not have these permissions, please consult your Zendesk admin for help.
Go to the Zendesk Admin Center.
.png)
Settings > Apps & Integrations > Webhooks.
In “Select a way to connect”, choose "Trigger or automation" and click "Next".
Set the following values:
Name: Kertos
Endpoint URL: https://api.kertos.io/api/v1/external/hooks/zendesk/
Method: POST
Request format: JSON
Authentication: Bearer Token
Token: API key from Kertos (see section above)
Click "Finish setup".
Creating a new Webhook in HubSpot
You will need HubSpot admin permissions to complete this setup. If you do not have these permissions, please consult your HubSpot admin for help.
Here is the link to the official HubSpot documentation on setting up Webhooks: link
In your HubSpot account, navigate to Automations > Workflows.
Create a new workflow
In the left view in the Data Ops section, select “Send a webhook”
Click the Method dropdown menu and select POST.
Enter the following parameters:
Webhook URL: api.kertos.io/api/v1/external/dsr-webhook/
Authentication type: API Key
API key: Add secret and enter the API key from the Kertos platform from the section above
API key name: Authorization
API key location: Request header
Request body: Customize request body. Enter the following properties:
data_subject_email: here choose the field that contains the data subject’s email which will then be used in Kertos for the request
requested_actions: “delete” or “access”, depending on the type of request you received. “Delete” will create a deletion request in Kertos, “access” will create an access request.
Test your webhook in the “Test action” section by setting an example email for the data_subject_email (e.g. test@example.com), the status should show “Success”.
Save the webhook
Here is an example configuration:

Importing from your E-Mail Inbox
It is also possible to import DSRs from your E-Mail inbox. Talk to our customer success team to setup automatic DSR creation from your inbox.
Creating a DSR manually
Go to “Requests”.
Click “Add Request”.
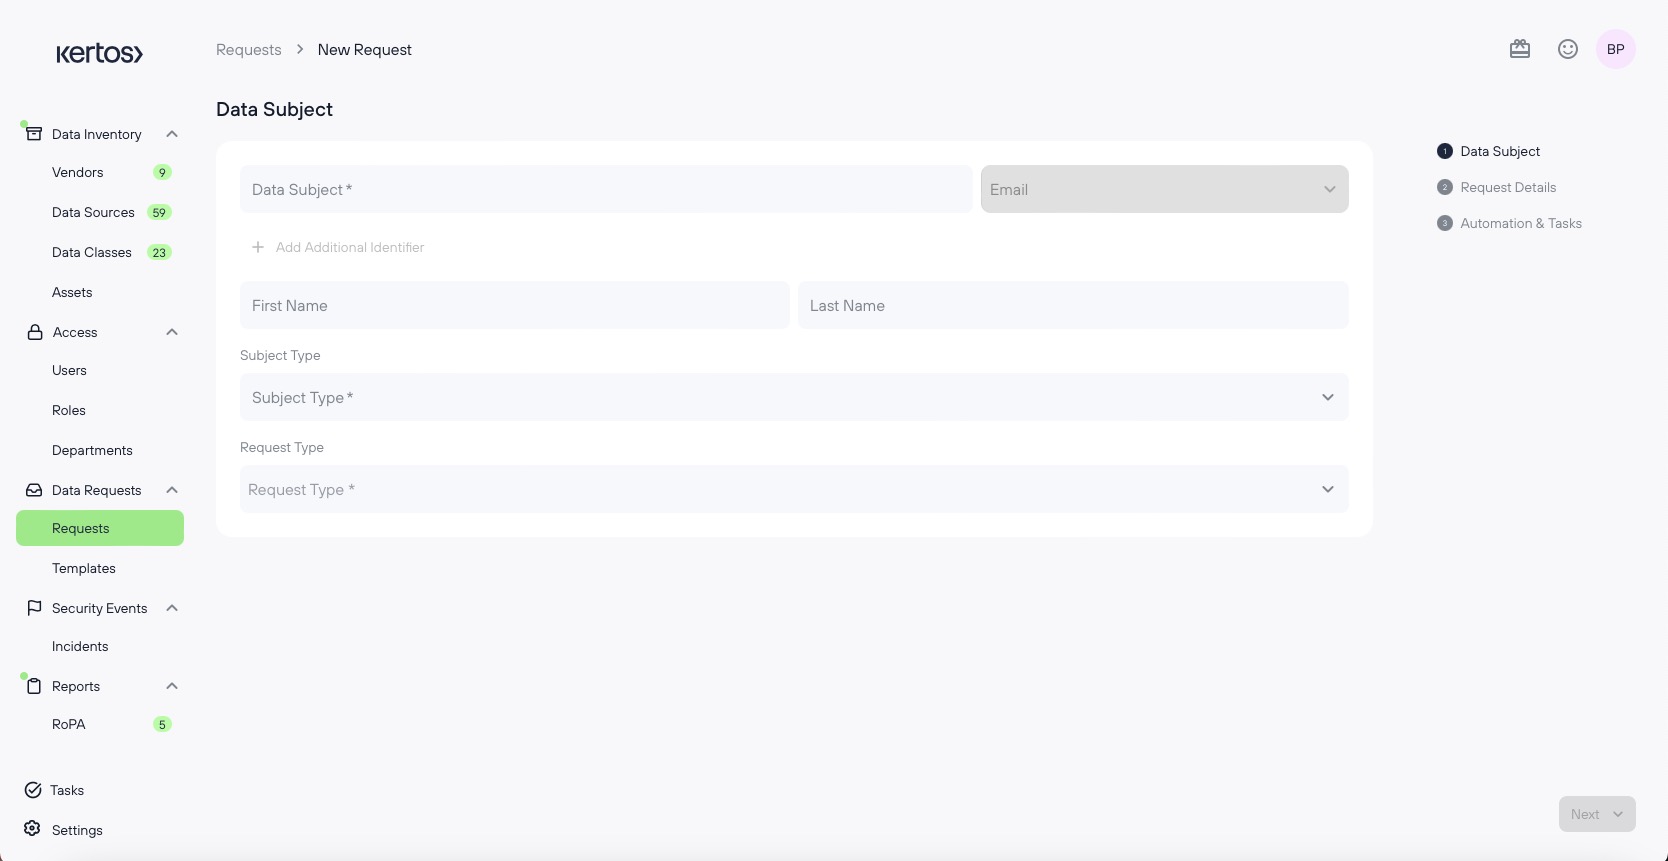
Fill out the Data Subject details:
Identifier: This is normally the e-mail address of the data subject, but you can also add more identifiers. This information is then being used to identify the data subject and will be the basis for searching for information in the data source associated to this identifier.
Additional Identifier: This lets you also provide a Unique ID for the Data Subject, which you can use to match system-wide identifiers. Some organizations might not make use of an identifier for all systems, making this an optional point of information.
In many instances, a data subject is identifiable by more than one central identifier. One common case is the usage of multiple e-mail addresses for the purchase of goods and services. This phenomenon is often caused by use of a guest account checkout or similar convenience practices, but it could also be caused by the system infrastructure of a client. Therefore, Kertos allows enriching a data subject by multiple identifiers.
The three categories currently supported by Kertos are E-Mail Address, Phone Number, and Additional ID.
First and Last name of the data subject (optional).
Subject type: This depends on whom the data subject is e.g. customer, employee, applicants, prospects etc. If this information is not available, you can choose “other”.
Request type: This defines the type of action/tasks that need to be performed. This can be:
Deletion
Access
Rectification
Restriction
Unsubscription
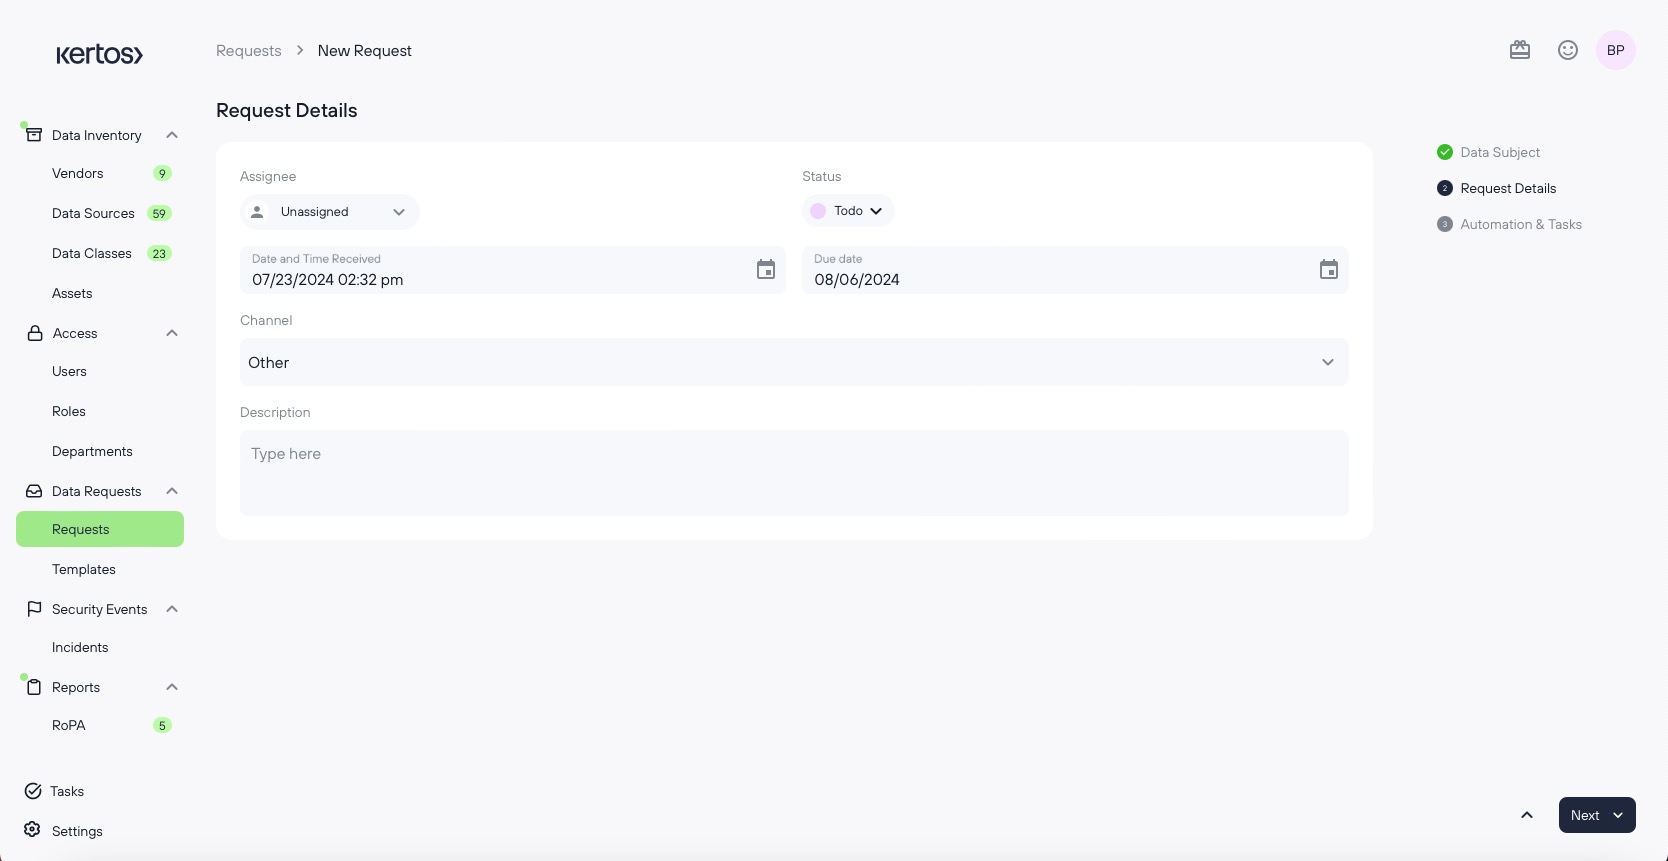
Fill out the Request Details:
Assignee: You can assign all users that have been invited to the Kertos platform to the task.
Status: When this is a request that is just being created and still needs some action to be performed afterwards (e.g. delete data in certain data sources) then setting the status in “to do” is the way to go.
Date and Time Received: This should correspond to the date and time you received the request from the data subject.
Due Date: Per default 30 days are added that this request is due (this is based on GDPR).
Channel: Lets you document where the request was coming from.
Description: If more information about this request is necessary.
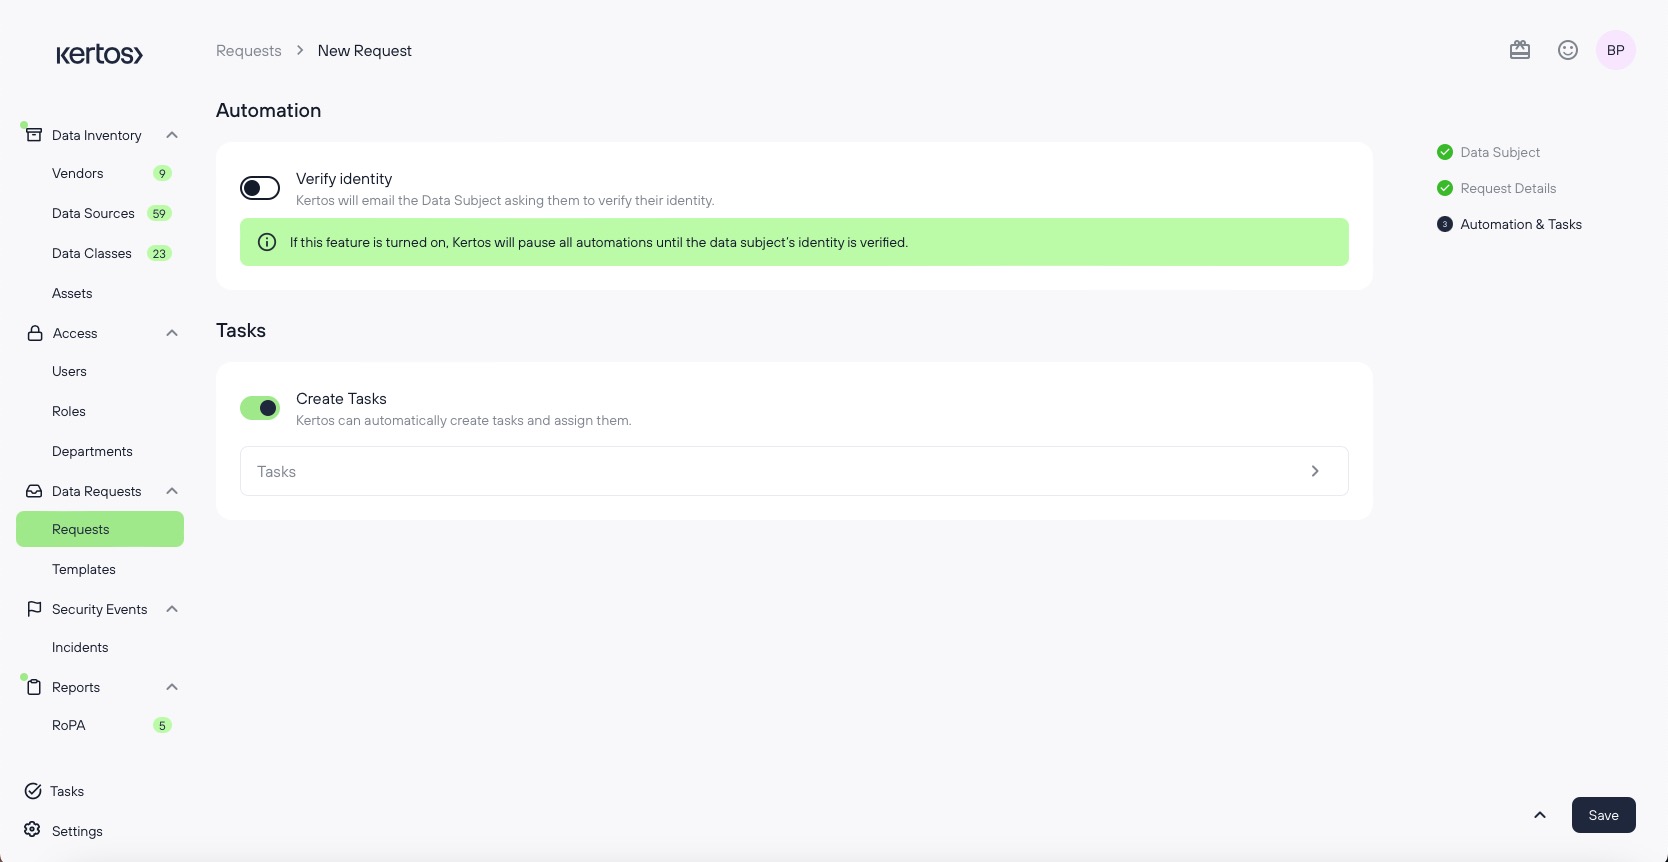
Fill out the Automation and Task details:
Verify identity: If enabled, Kertos automatically sends an email which is sent to the data subject’s inbox to verify the address. This can help if it is unclear whether the email the request was sent from and the identifier for (e.g.) deletion do not correspond.
Create tasks: If enabled, Kertos automatically creates a task for all Data Sources that process the relevant Data Subject Type. For example, if a customer asks for deletion, a task will be created for all Data Sources that contain customer data to check if personal information for that Data Subject is existent in these data sources.
To create the DSR and the corresponding tasks, click “Save”.