
Inventorization of vendors
Overview
Vendor Management helps you document and track all external service providers used within your organization. These vendors often have access to sensitive data or are part of critical infrastructure, making their proper documentation and review a core part of compliance with frameworks like ISO 27001, GDPR, and NIS2.
Kertos automatically identifies vendors during integration discovery and provides an easy workflow to manage their status and information.
Problem Solved
Organizations often use dozens of third-party services, but fail to track or assess them properly. This leads to gaps in documentation, audit headaches, and increased risk of non-conformity during certification.
Without a centralized place to manage vendors, users waste time figuring out which services are relevant, which ones are outdated, and whether proper due diligence has been done.
Key Benefits
- Automated Vendor Detection: Kertos discovers vendors automatically via integrations, saving time and reducing human error.
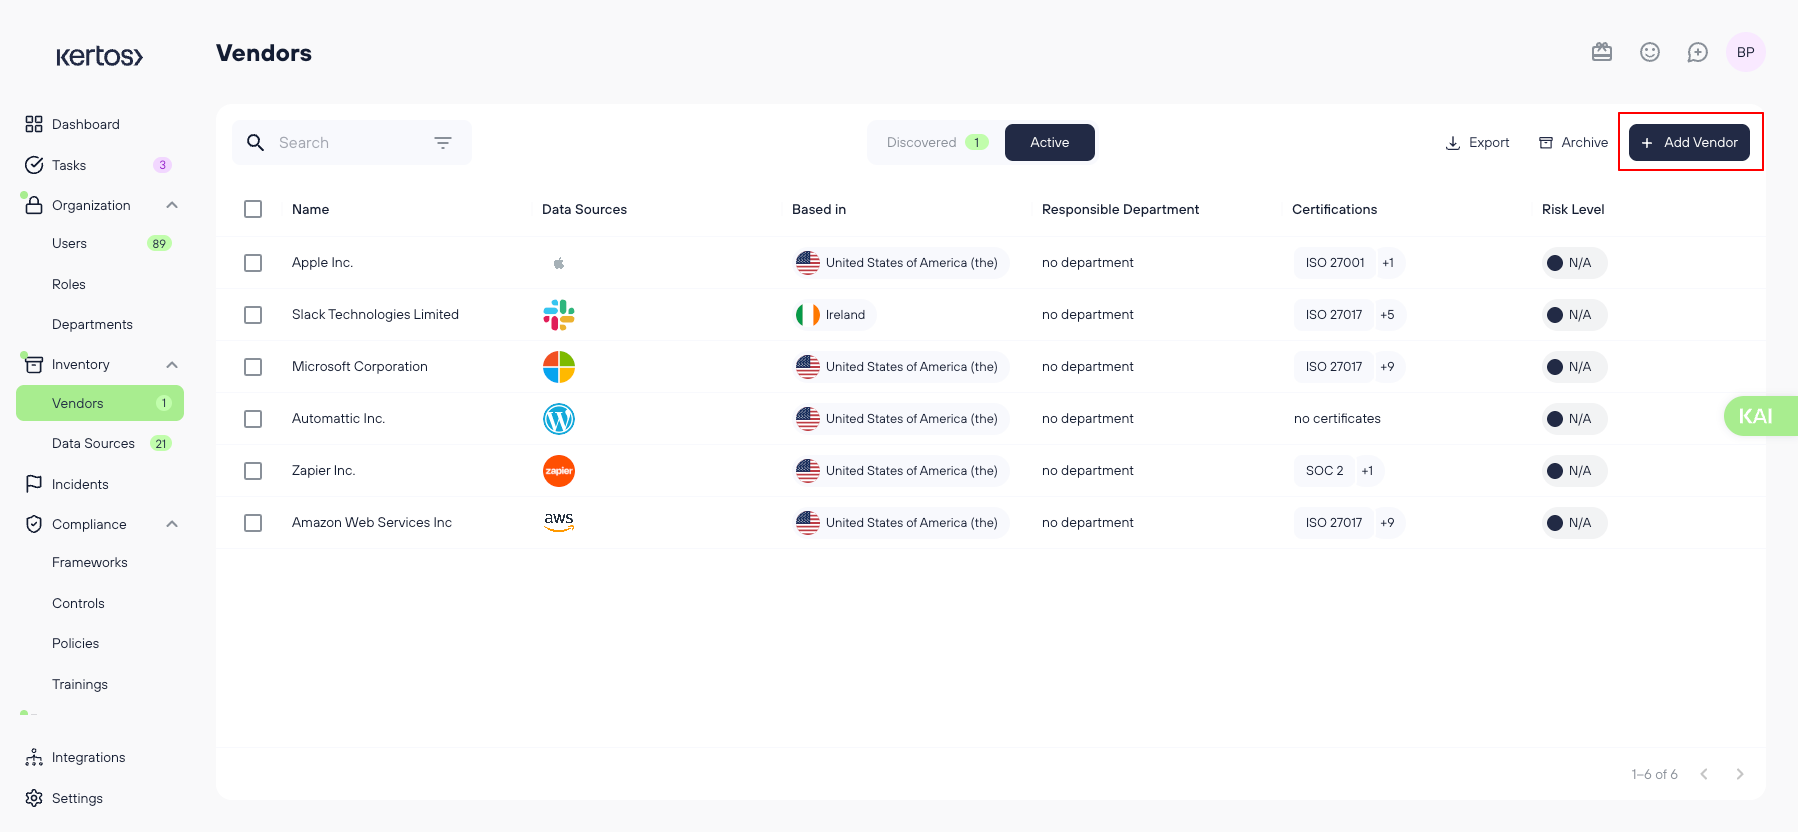
- Streamlined Review: A dedicated UI lets you activate relevant vendors and archive outdated ones, keeping your inventory clean and audit-ready.
- Continuous Compliance: Archived vendors won’t reappear in future scans, ensuring you maintain a clear view of only what matters.
- Integrated Workflow: Easily access and manage vendor details, link them to assets or processes, and use this data in your compliance documentation
How It Works
1. Accessing Vendor Management
Go to “Vendors” under the “Inventory” section of the Kertos platform.
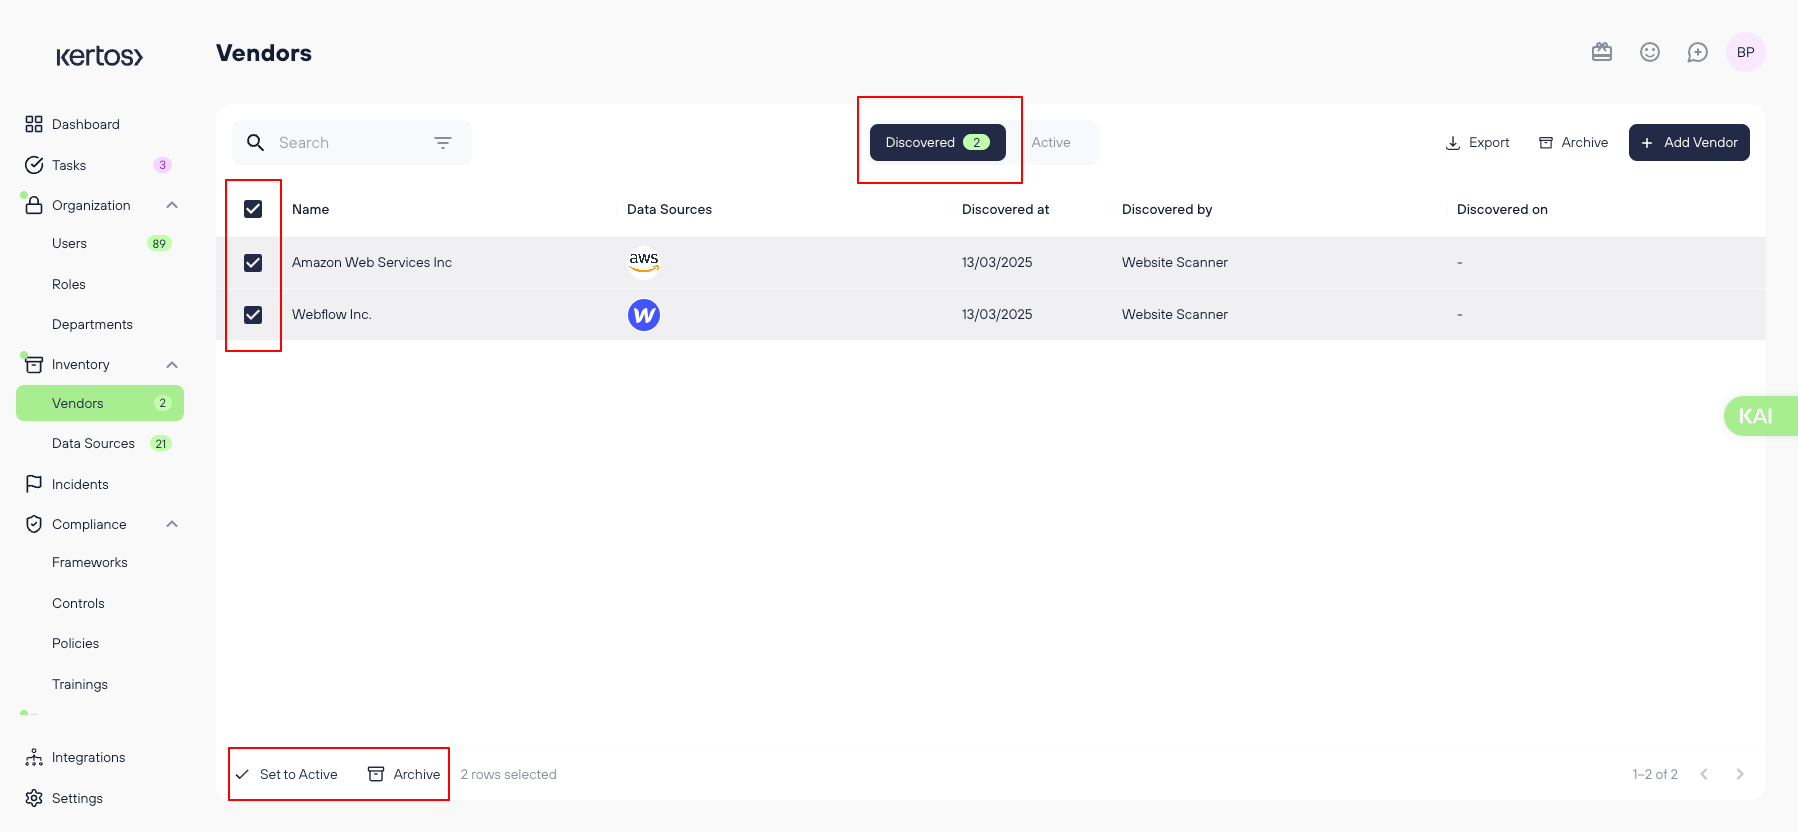
2. Review Discovered Vendors
After running discovery integrations (e.g., AWS, GCP), Kertos automatically lists identified vendors under the “Discovered” tab.
3. Activate Relevant Vendors
Select the vendors that are in active use within your organization and click “Set to Active.” These will be added to your compliance scope.
4. Adding Vendors manually
If a vendor of yours was not identified in the discovery, you have the option to add it manually. Every manually added vendor will be automatically assigned active status.
- Click “Add Vendor”.
- Now you already need to provide the missing information as described below in "Documenting basic information".
- Click “Save”.
5. Documenting basic vendor information manually
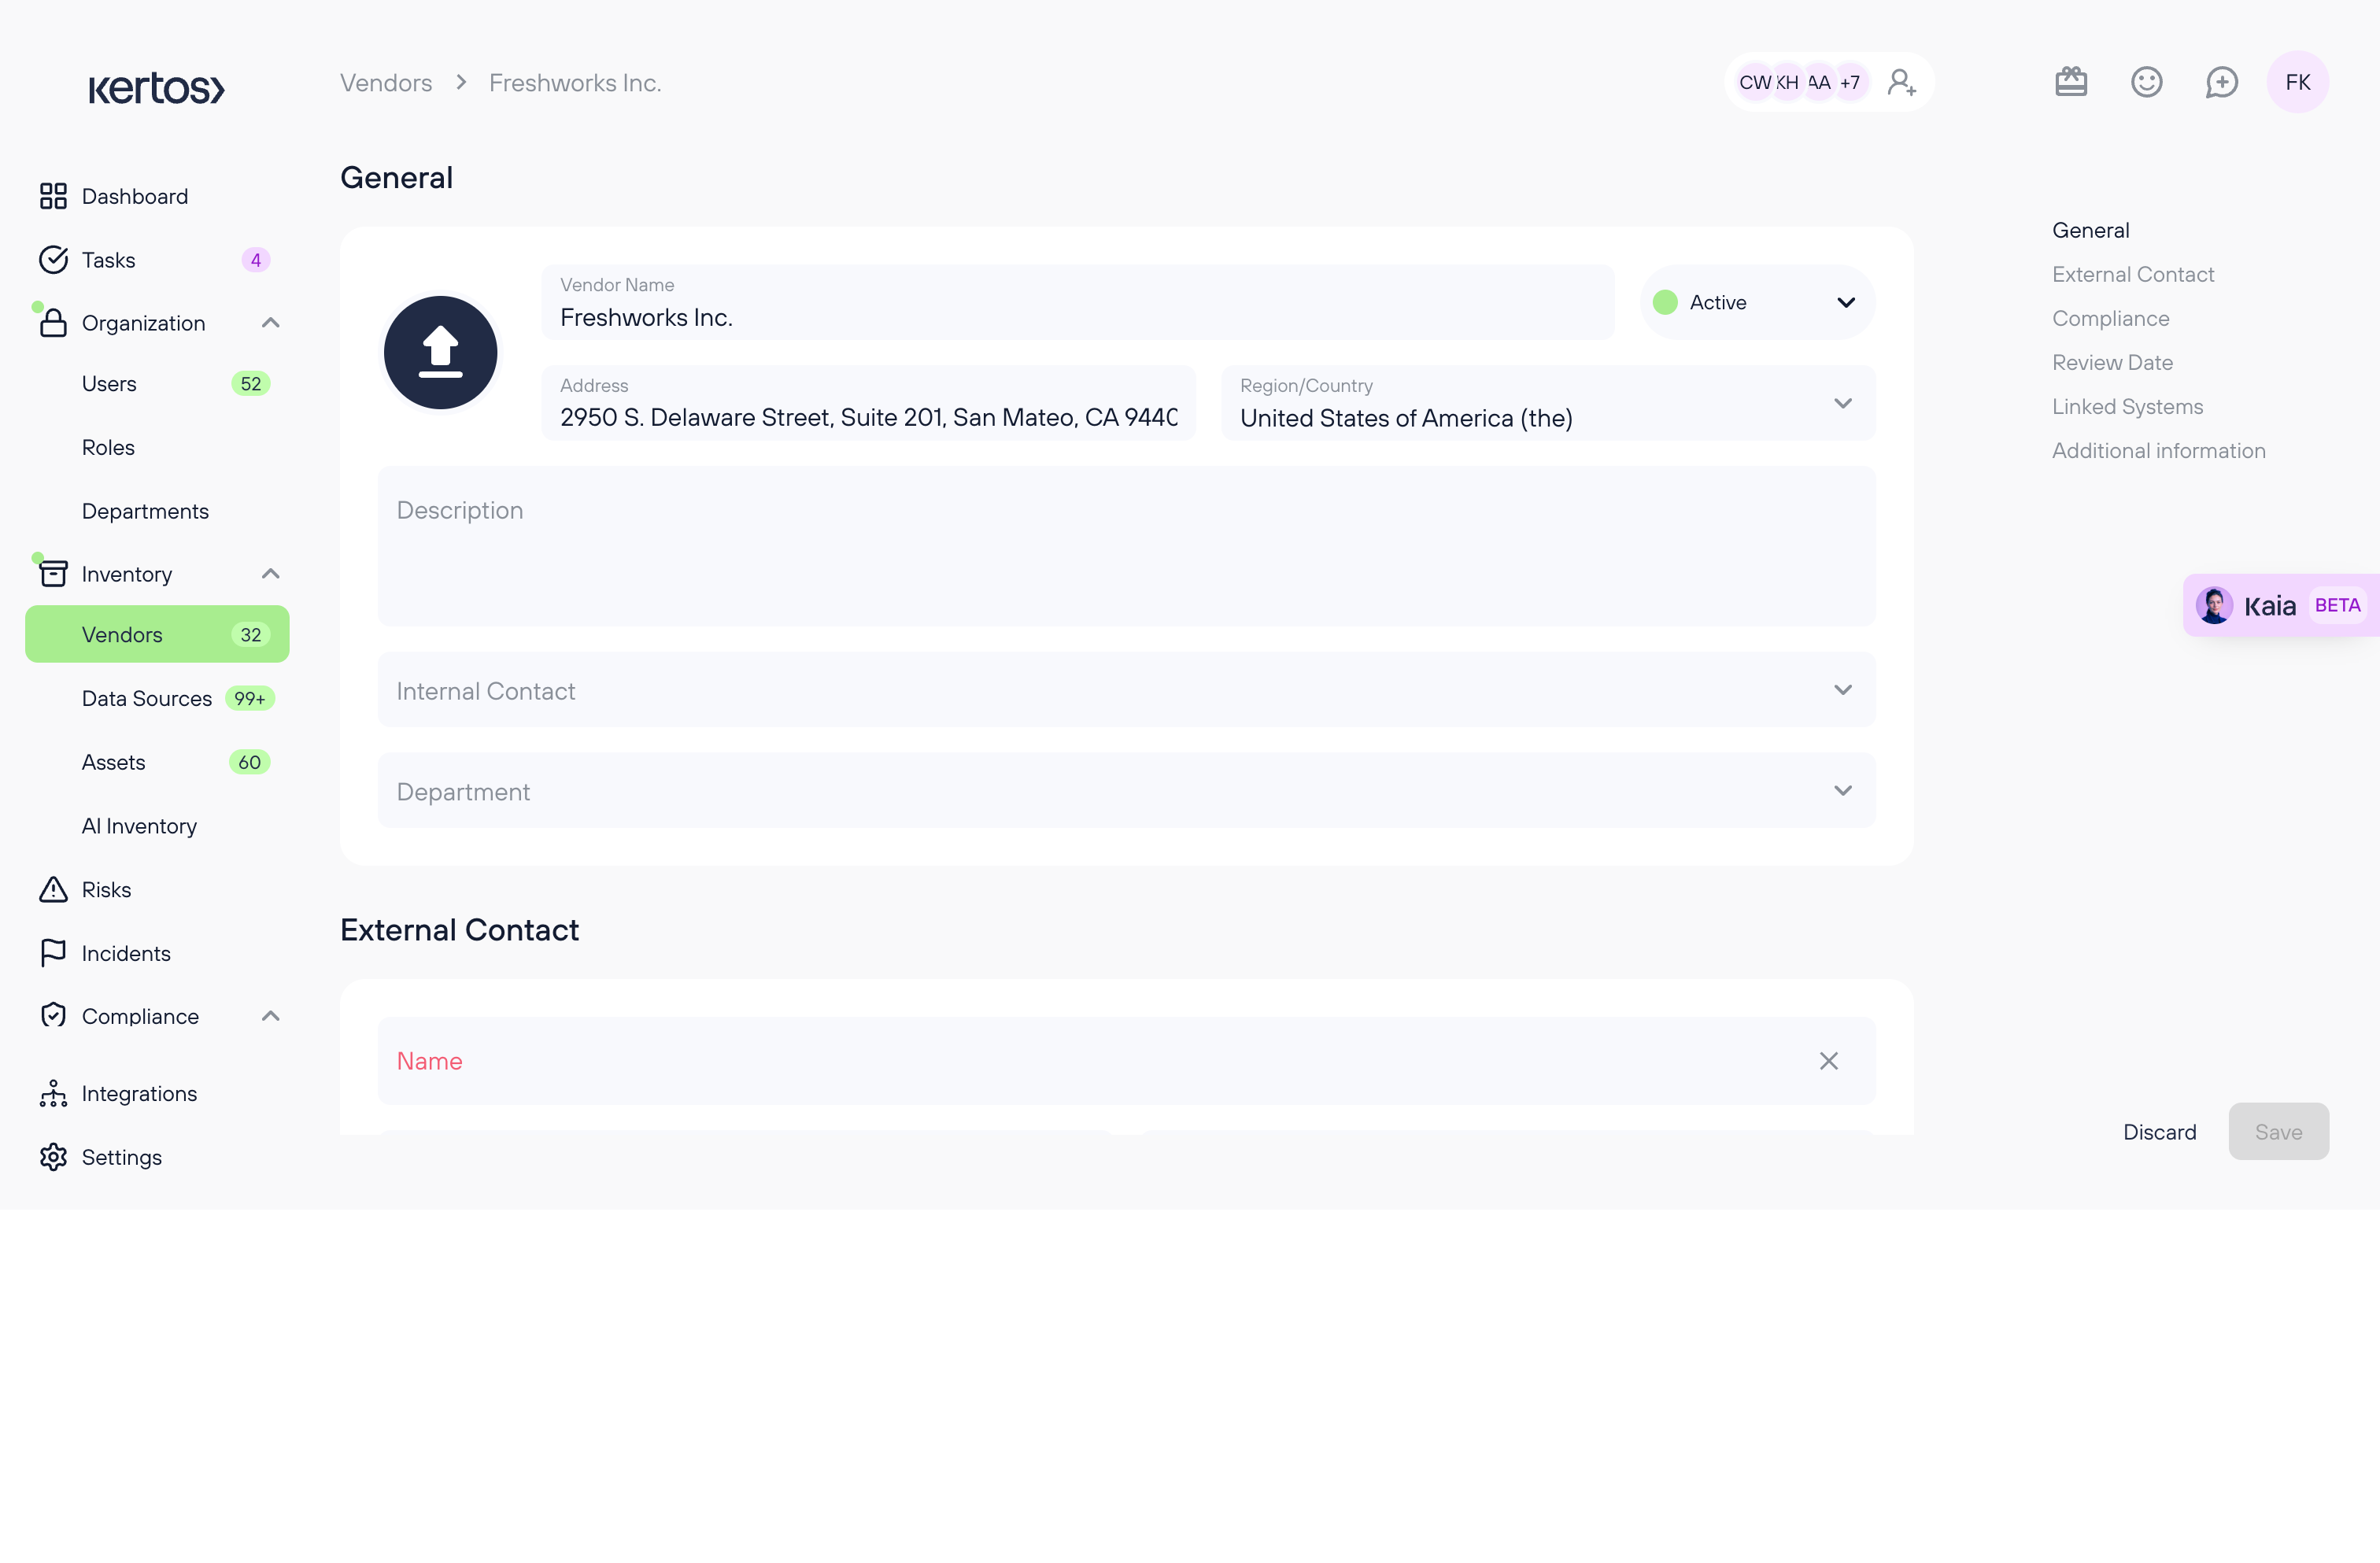
Among the basic options for documentation in the detail view, there are:
- Vendor name The legal name of the vendor
- Address add the HQ location here
- Region/ Country Region/ Country of the headquarters
- Description What does the vendor do
- Internal Contact Who is responsible for this vendor
- Department Which department is responsible for this vendor
- External Contact incl. E-Mail and phone number
- Vendor Risk based on your personal risk evaluation (e.g. which data do they process, if they play a critical role for your organization etc.)
- Compliance Standards Certificates, reports that you know the vendor possesses
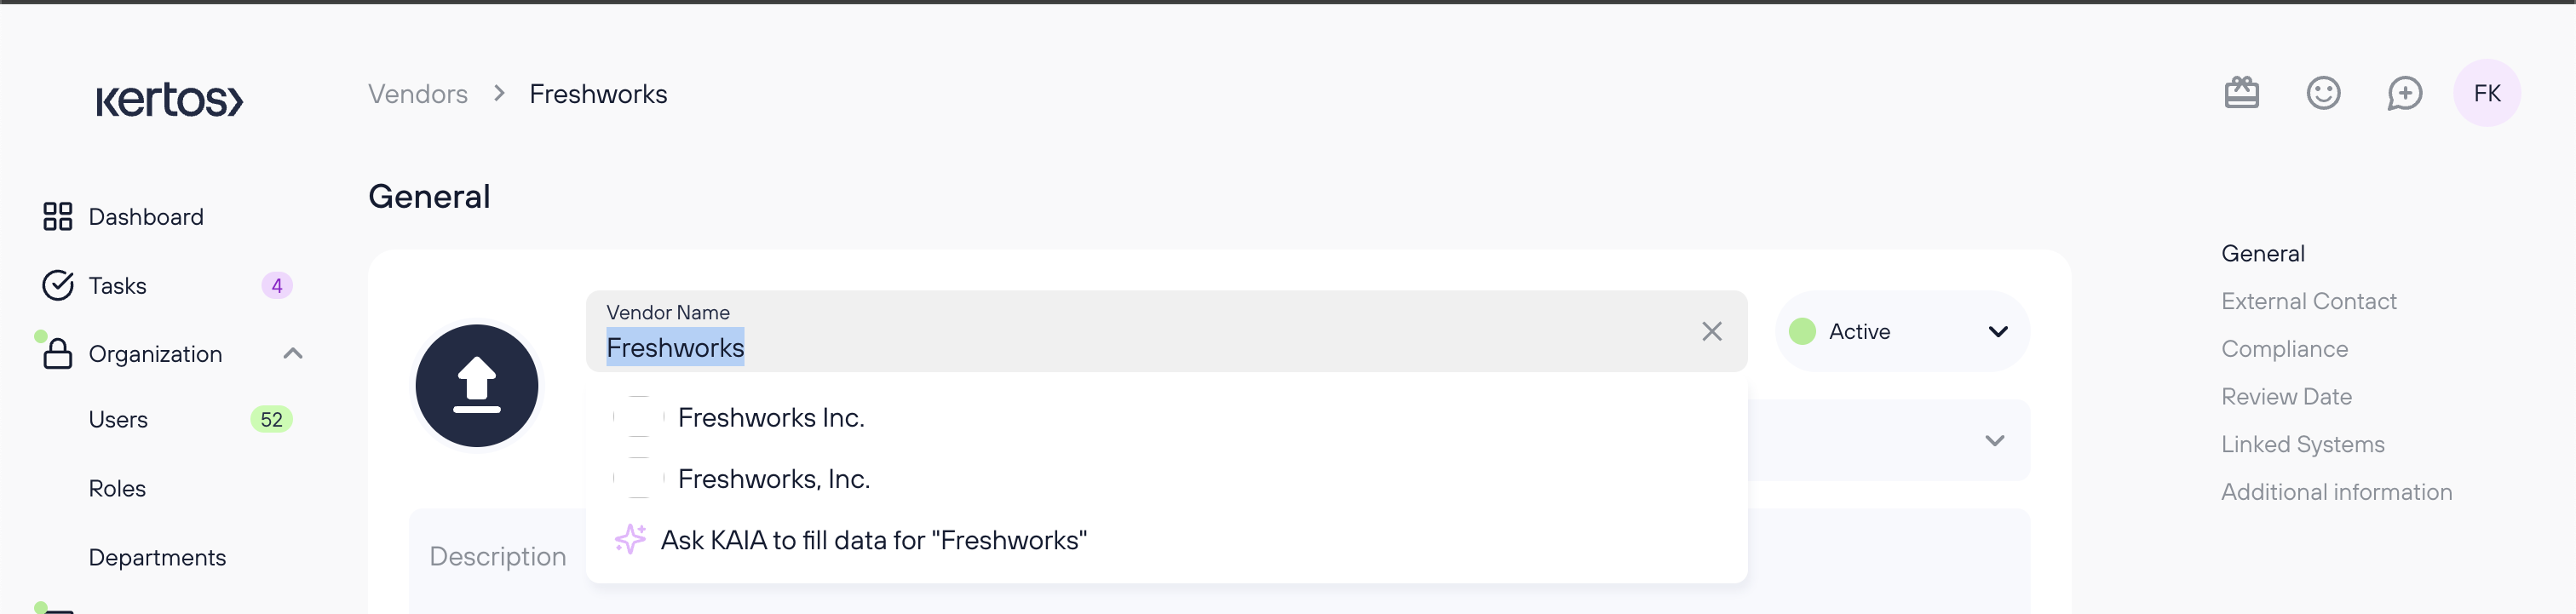
6. Documenting basic vendor information automatically through Template and Autofill
When creating a new vendor, there are two functions that enable you to document vendor information more quickly:
- Create from template: we have more than 3000 vendors and detail information stored in our system. When you choose this all information + linked system are created in your account.
- Auto Fill: We live crawl information from this vendor and store it for you. More info can be found here: https://docs.kertos.io/en/article/kaia-autofill
7. Compliance Standards: Adding Vendor Certificates
For some widely-used vendors, Kertos will automatically set their certificates for you. If there are none available for pre-setting, you can add certificates manually.
.png)
- Click into the Vendor Certificates bar.
- Choose the desired certification from the list.
.png)
If it does not appear in the list, you can add a custom vendor certificate by entering its name and click “Add vendor certificate”.
.png)
If you want to remove a custom certificate, click “edit vendor certificates”. You can remove the certificate by clicking on the red minus that appears.
Upload Data Processing or joint controller agreement
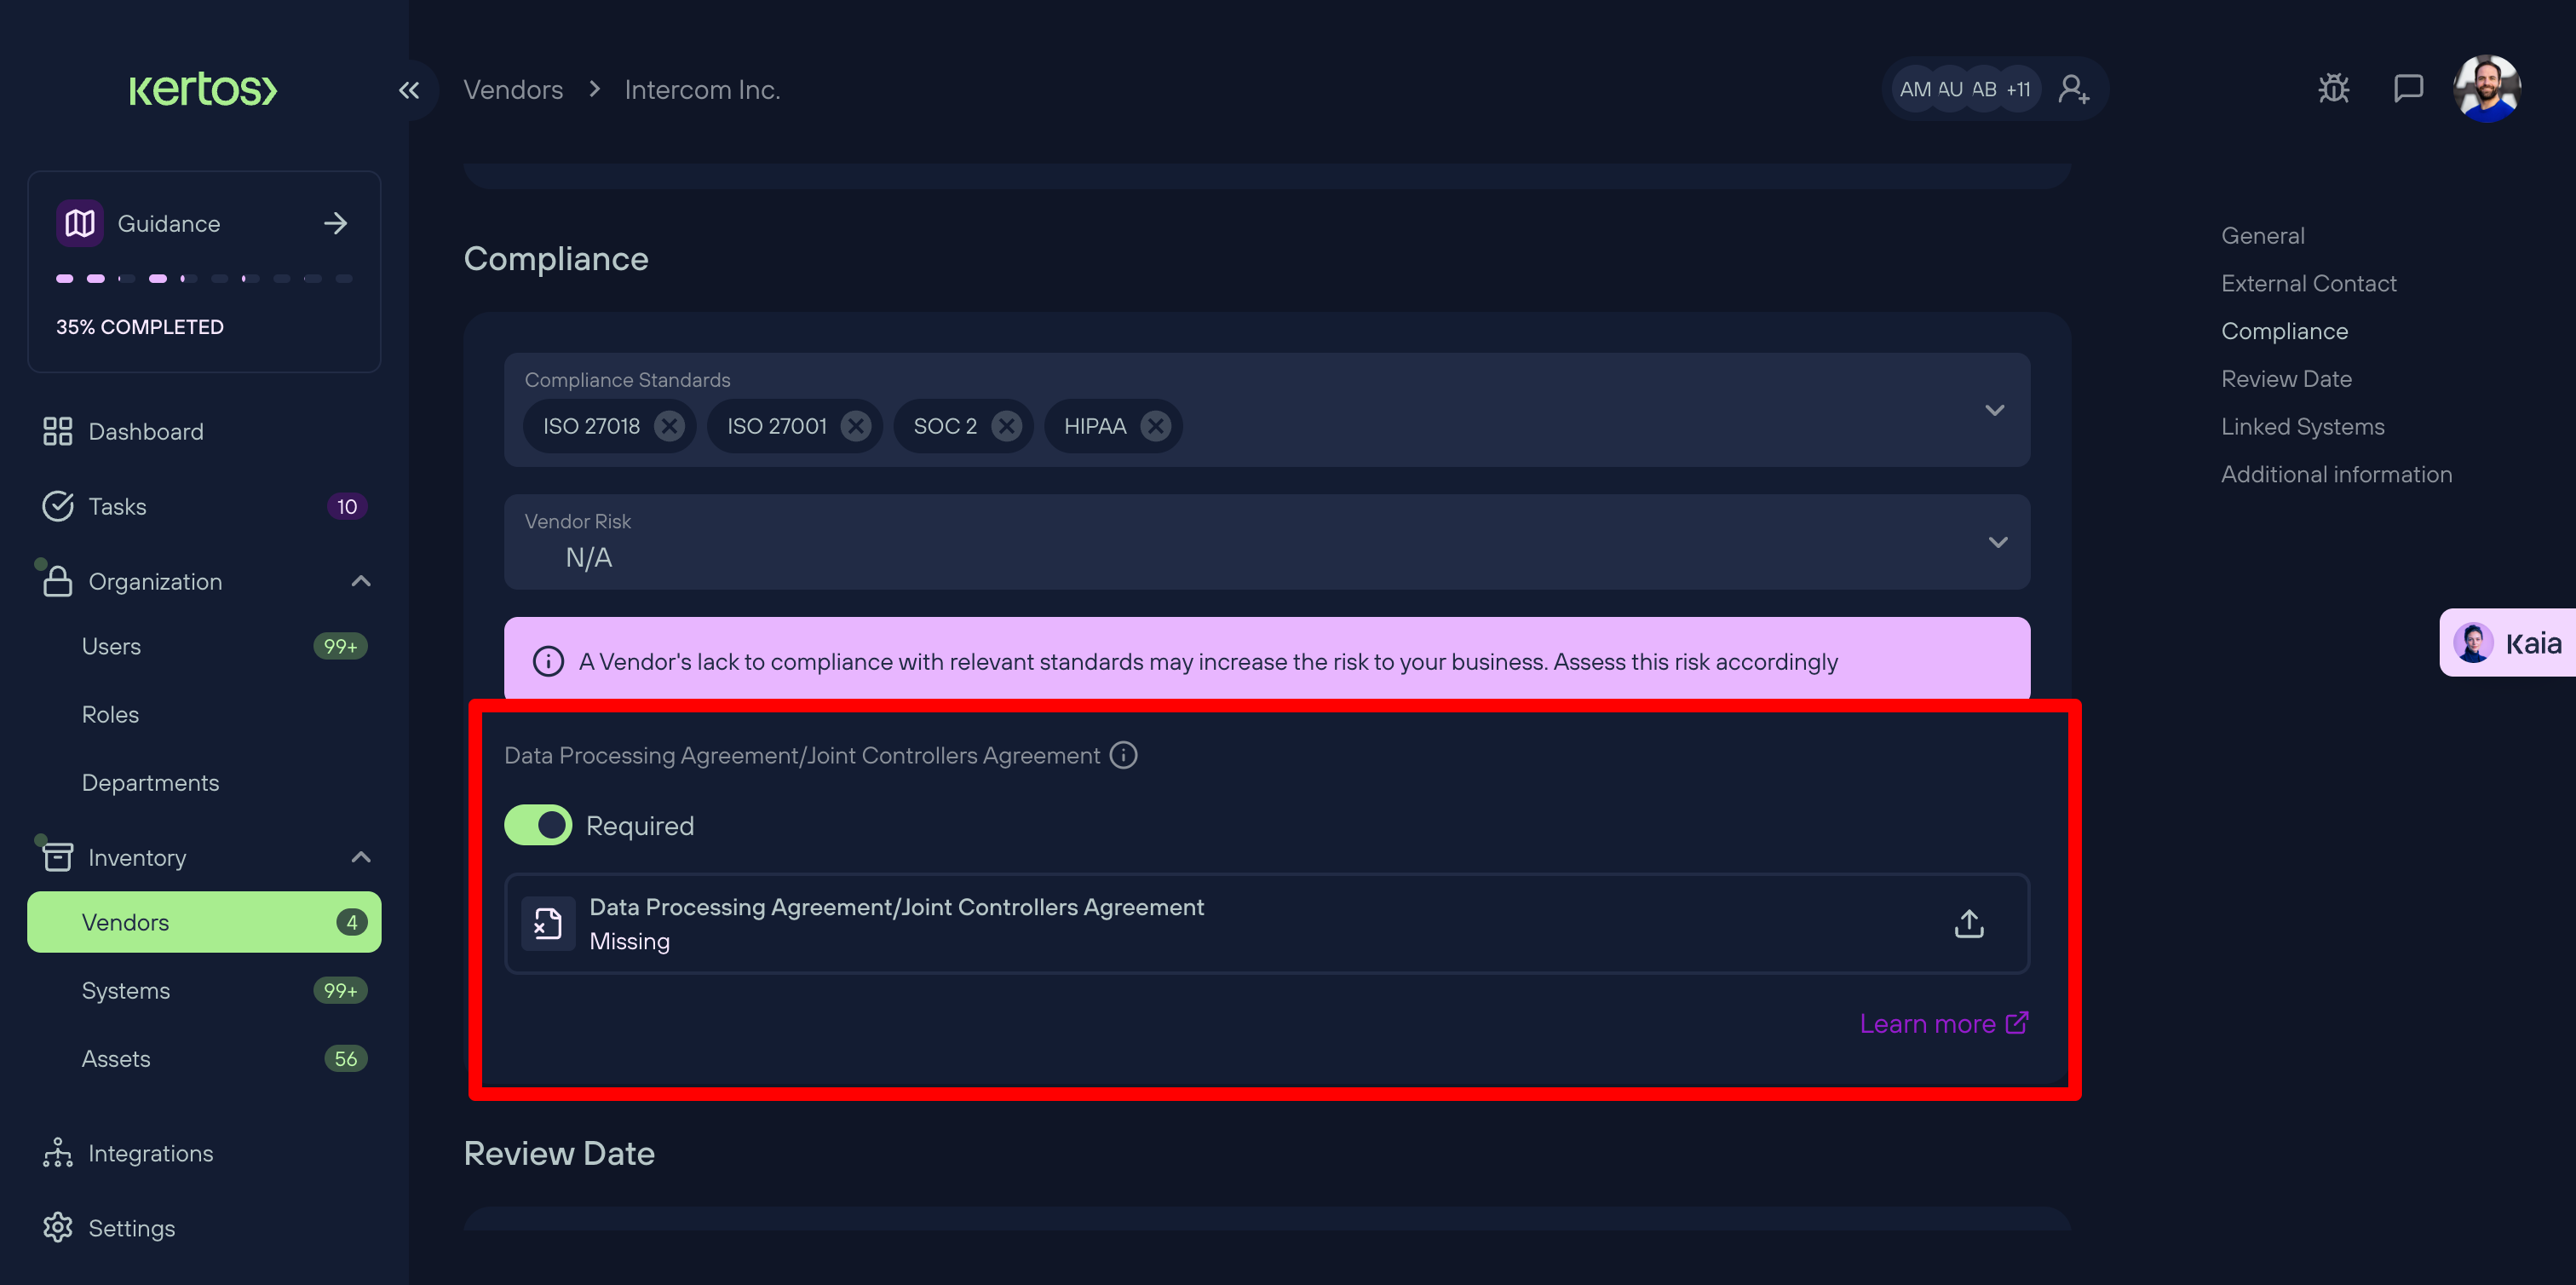
We have added the one pre-defined for accessibility:
- Data Processing Agreement/Joint Controller agreement
Depending on the vendor’s role in the processing of personal data, different agreements are required:
- DPA: If the vendor acts as a processor, meaning they process personal data on behalf of your organization and under your instructions, a Data Processing Agreement (Art. 28 GDPR) is required.
- JCA: If the vendor is a joint controller, you will have to upload the Joint Controller Agreement. This is the case when “two or more controllers jointly determine the purposes and means of processing” (Art. 26 GDPR).
- Independent controller: If the vendor acts as an independent controller (e.g. a tax advisor handling payroll), no DPA or JCA is required.
Per default, the toggle is set to required, as most vendors process some kind of data.
If you have access to the GDPR modules of kertos you can define the role of a vendor for each processing activity.
8. Selecting the Review Date
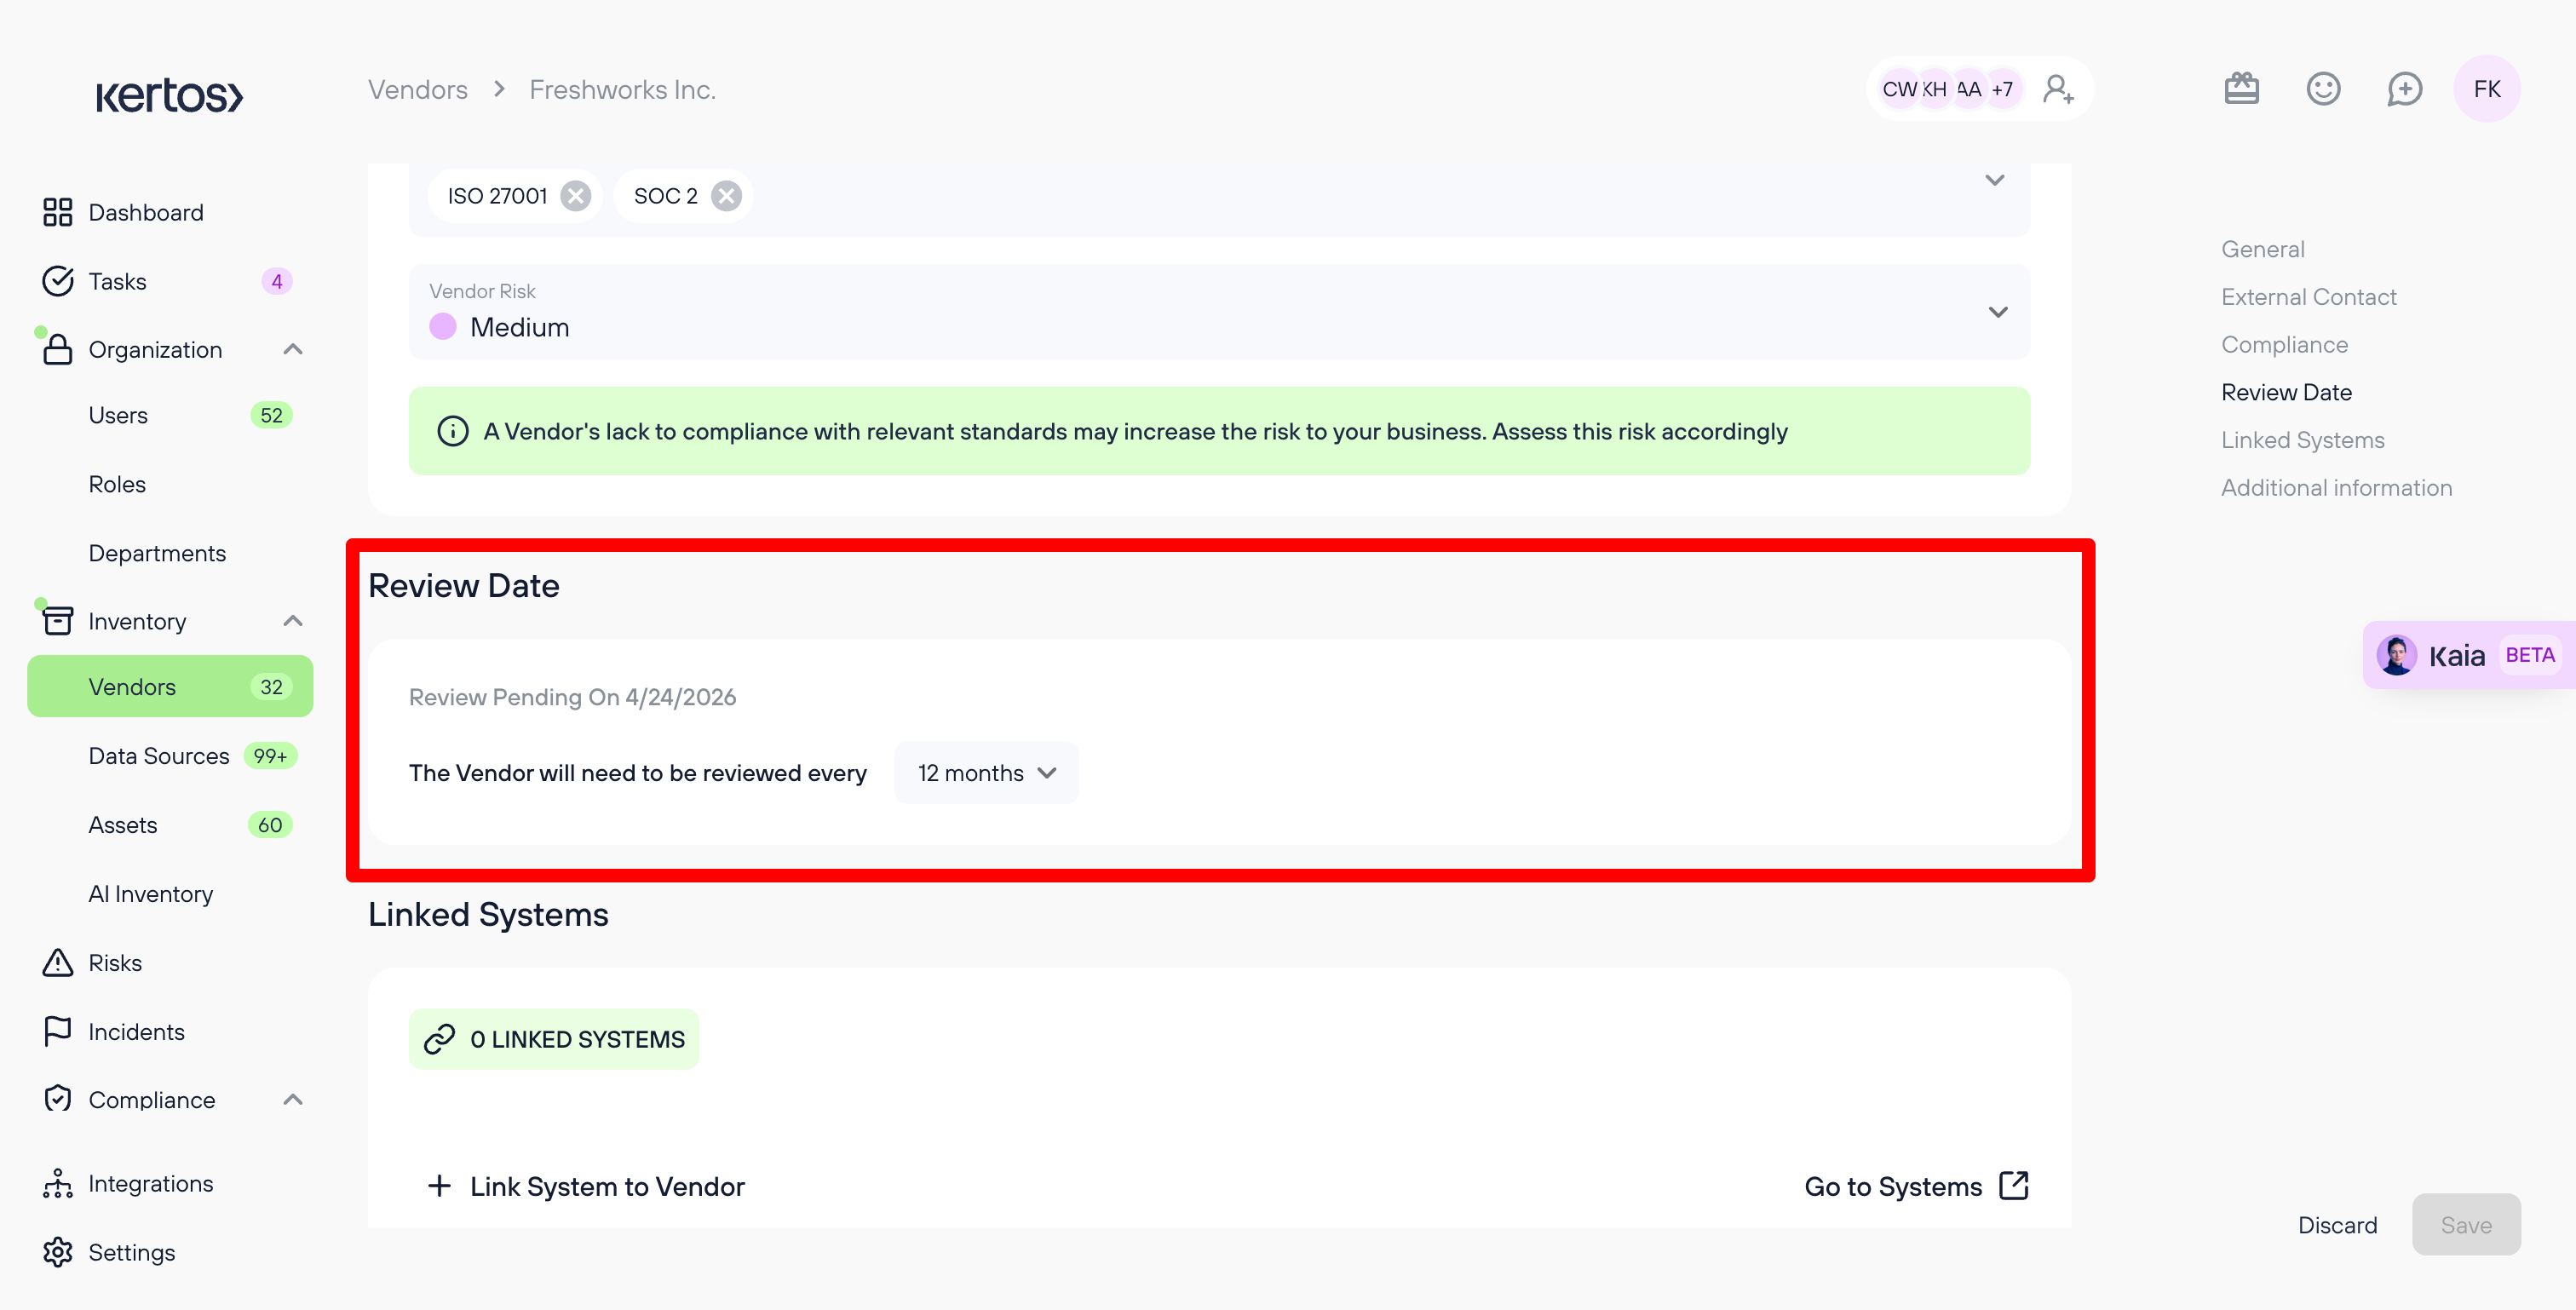
As most of the frameworks and standards suggest having regular vendor reviews to re-asses risk also based on changed information (e.g. outdated vendor certificates), we introduced the review section.
You can choose between 6 and 12 months review period. Once the end date is reached, the vendor status will move to "needs review" and a task is created and assigned to the owner of the vendor to review this vendor.
From the task you get redirected to the respective vendor and can review, change and store the changes, and then the review period starts from scratch again.
This will support you in having up-to-date information around your vendors.
9. Assigning Systems
This step is very important as it connects systems to their respective vendors.
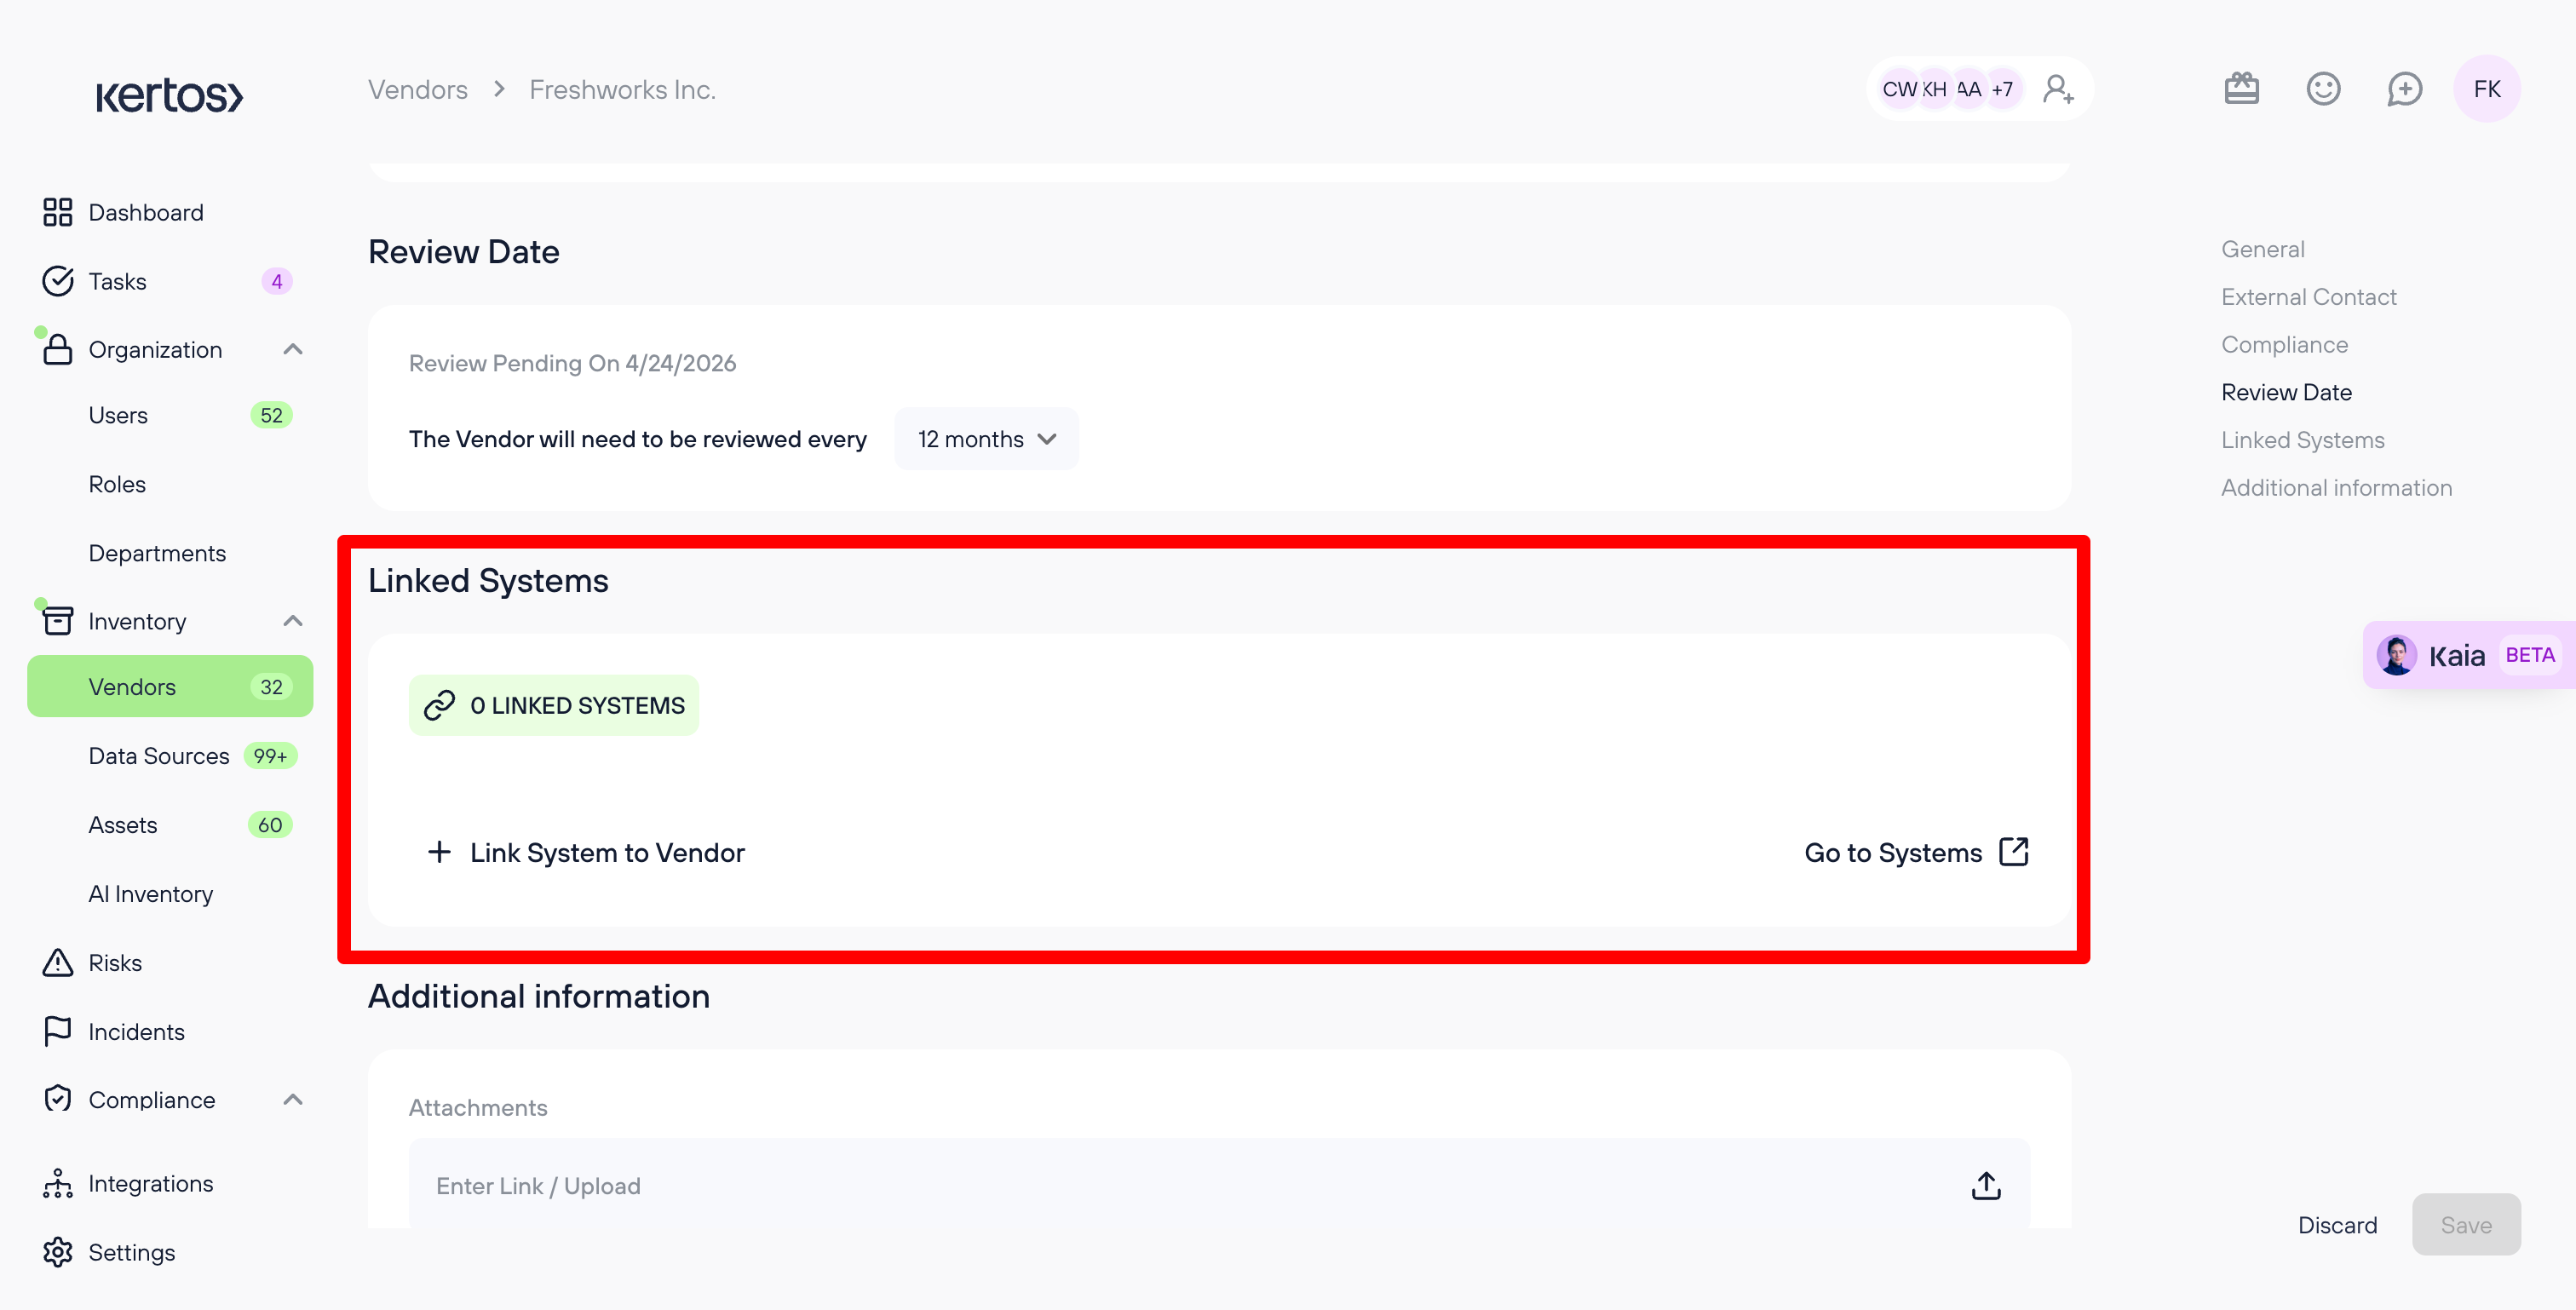
- Scroll down to the section "Linked Systems".
- Select the systems that are provided by this vendor.
Alternatively, you can assign systems to a vendor from the system page.
For more information about Systems, see Inventorization of Systems
When clicking on "go to systems" you will be directed to the systems page.
If you don't add any systems, you will be asked if you want to add systems to a vendor, when creating a new vendor. There are certain vendors (e.g. cleaning company) that may not offer any system. However, as a lot of vendors provide some kind of system, you are being asked if a system needs to be added to a vendor.
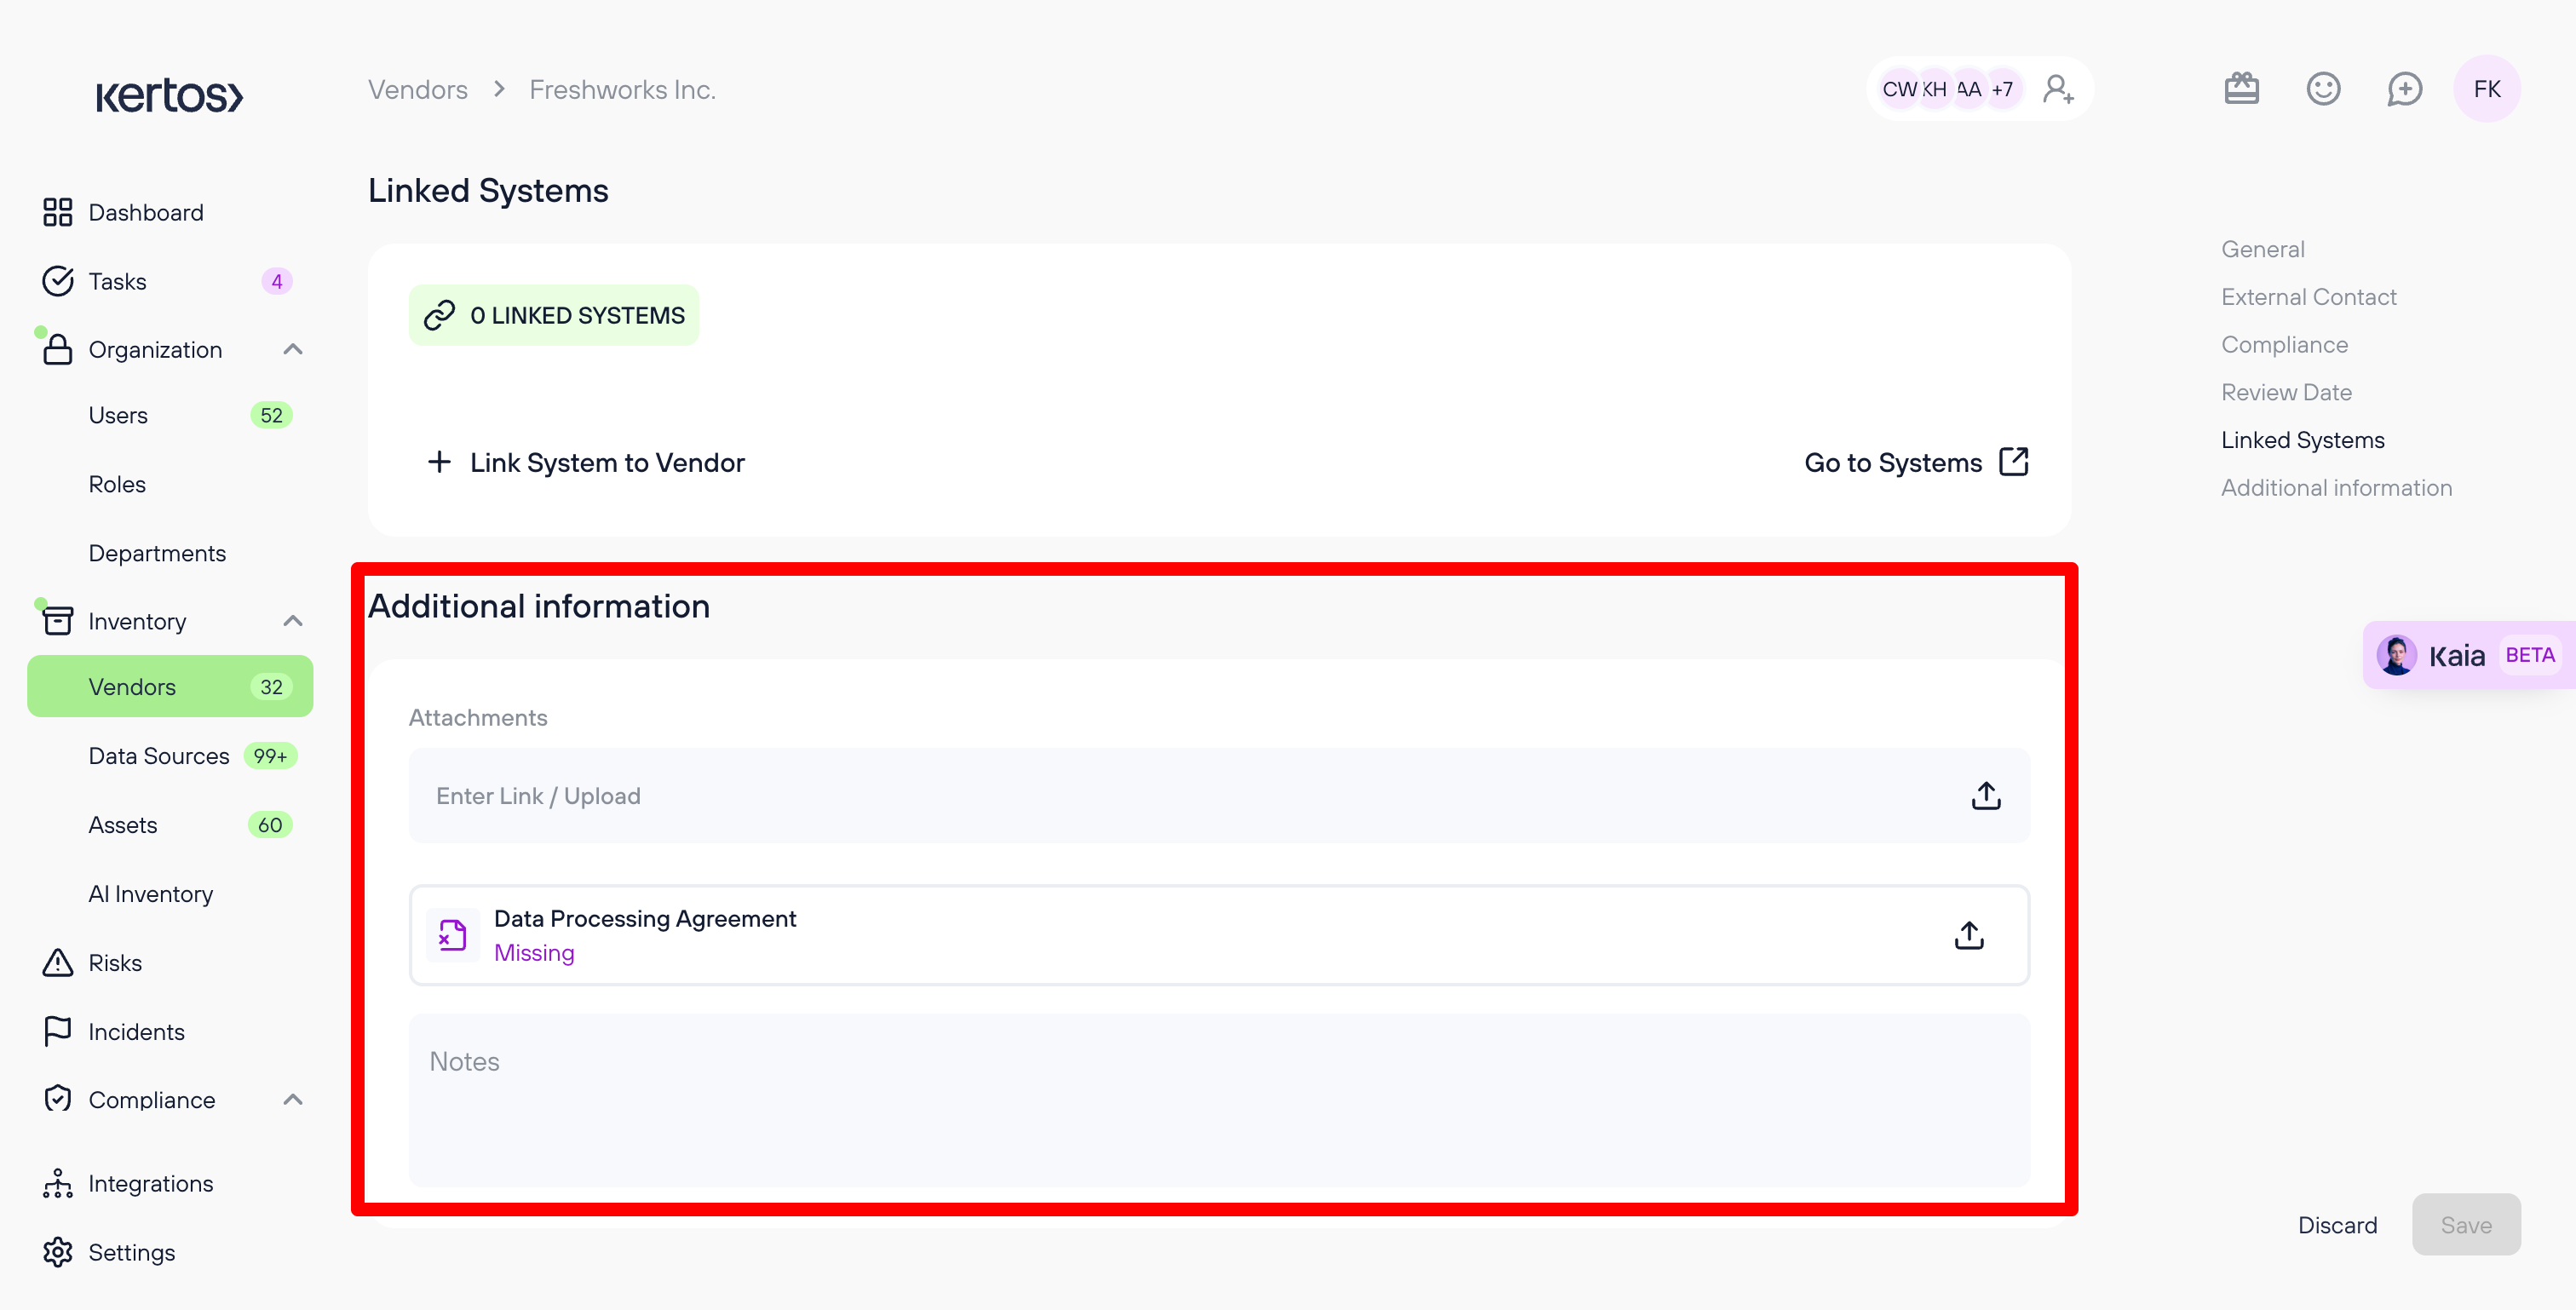
10. Adding Additional Information
You can add any document that belongs to a specific vendor on its detail view.
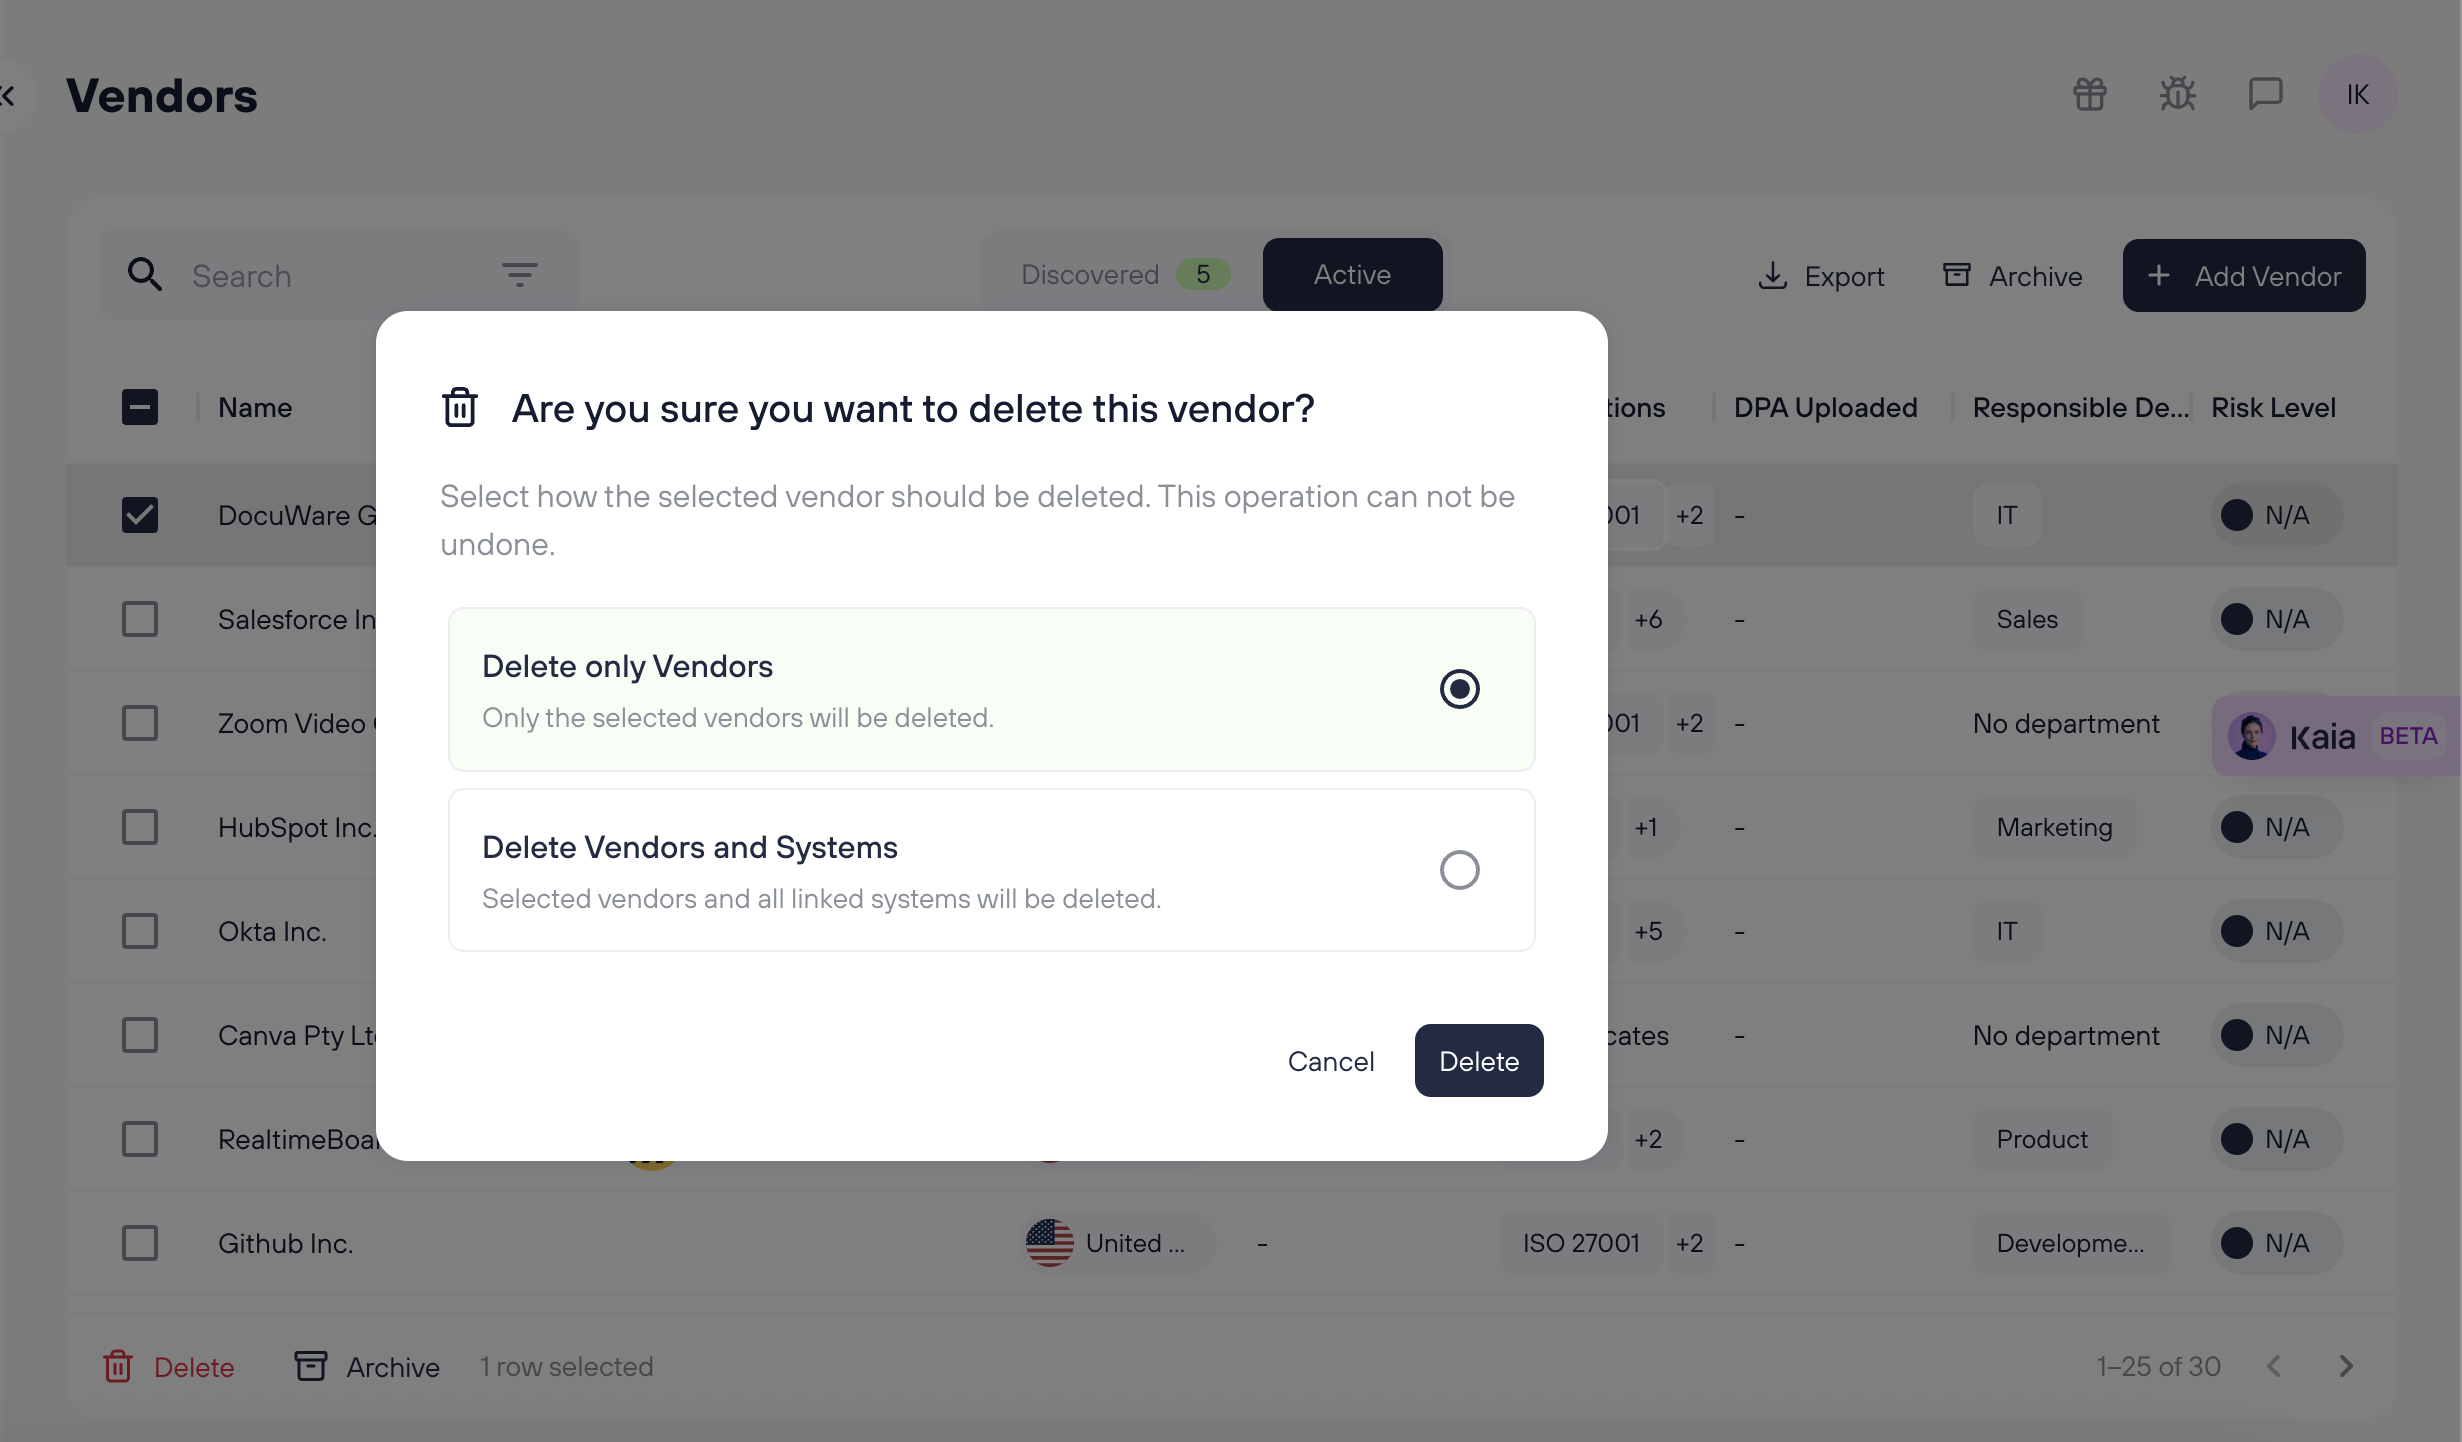
11. Archiving/deleting vendors
You can delete or archive vendors.
Deleting = system might be found again by Discovery Channels
Archiving = system is ignored by Discovery in the future.
More info can be found here: https://docs.kertos.io/en/article/discovery-explained
When you delete a vendor that has systems assigned to it, this message will appear.
Frequently Asked Questions (FAQs)
What do I need to fill in for each vendor?
To create a vendor, only the name is required.
However, for compliance purposes, you should also add:
- HQ location (including country)
- A short description of what the vendor does
- Any linked systems or services (if applicable)
What qualifies as a “vendor”?
Provider of any third-party system, service, or platform that your organization uses to process, store, or access data, such as SaaS tools, hosting services, analytics platforms, and subcontractors.
Why do I need to activate vendors?
Only activated vendors are included in your compliance documentation. This ensures audits only focus on systems that are actually in use.
What happens to archived vendors?
Archived vendors are hidden from your inventory and won’t reappear in future discovery scans—unless manually reactivated.
When is my vendor management considered compliant?
Your vendor documentation is compliant when:
- All relevant vendors are activated
- Required fields (HQ, description, linked systems) are filled in
- Irrelevant vendors are archived and periodically reviewed
How do I keep my vendor documentation up to date?
To keep your vendor documentation up to date the following must be ensured:
- Add new vendors as soon as you begin working with them
- Use Kertos Discovery Integrations to detect shadow IT and automatically surface new vendors
- Regularly review your vendor list and update or archive as needed
Can I edit vendor information manually?
Yes. Once a vendor is activated, you can add more details manually—such as owner, classification, and risk impact—directly in the Kertos platform.
How do I link vendors to systems or processes?
You can assign vendors to assets or business processes in Kertos. This shows where vendors are involved and helps with risk mapping and audit traceability.
How does this help with ISO 27001 or GDPR?
Both standards require that organizations assess and document risks from third-party providers.
Kertos supports this with vendor discovery, structured fields, and the ability to link vendors to critical systems—all within a single compliance inventory.